Sunday, March 14, 2010

Traditional Irish Soda Bread


Well friends, it's that time of year for one of my favorite holidays, St. Patrick's Day! Making Irish soda bread has been a tradition that Megan (my roommate and cousin, for those of you who may not know!) and I have kept for the past few years. Personally, I really enjoy soda bread although I think it might not have the best reputation out there. I've actually heard mixed reviews...some people think it's a bit dry and bland, and then others loooove it. Well, I just so happen to be one of those people who love it! I find it to be a tasty, comforting food. And the soda bread I make is not dry, so I don't know what those people who think it's dry are thinking! ;-)

Irish soda bread is a great bread recipe because it requires much less work than a yeast bread, which usually needs several hours for rising and a lot of physical effort for kneading! Today, I used my Kitchen Aid mixer for about 90% of the work, and I had to put forth almost no "man power." It was a piece of cake...er, it was a piece soda bread, I mean. :)


Alrightie, time to share the recipe! This year I tried a new recipe. I followed Ina Garten's recipe (she's the Food Network's Barefoot Contessa). It is quite delicious!! The recipe I used today can be found here, and a video of her making the bread can be viewed by clicking here. Her recipe gets a five-star rating, so it's gotta be good, right?

It was really a very simple recipe to make. It calls for normal ingredients, which, as you know, is always a bonus in my mind! The only thing I did differently today was instead of using the recipe's four cups of all-purpose flour, I used three cups of all-purpose flour and one cup of whole wheat flour. I am sure you could use half of each or maybe even make the majority of the flour whole wheat; it's your call!


This first picture above is of the dry ingredients with the cold butter slices...then you can see the buttermilk, which is the key ingredient, I think, for soda bread! It helps keep the bread from being dry. In the third picture I am pouring the buttermilk into the dry ingredients. Can you see those orange specks in the buttermilk? It's orange zest! 


Here you have the mixture as it's starting to come together...and next you can see the consistency of the dough once it's all mixed. It is a pretty sticky dough, just to warn you! Next, you'll want to mix in the raisins (or currants, whichever you prefer). Ina recommends coating the raisins with a tablespoon of flour, which I did here as you can see. It apparently helps keep the raisins evenly distributed throughout the bread instead of having them sink to the bottom. Good tip, Ina! :)


How do you deal with the sticky-ness of the dough? Well, I'd recommend flouring the surface on which you knead the bread...you don't have to knead it for long though, don't worry! As I mentioned earlier, that's one of the beauties of soda bread as compared to other breads.


Here's the loaf, just before it's ready to go in the oven. Notice that I scored the top of it in a criss-cross design. This will help the bread cook through and help you be able to detect it's "doneness."


You can see the bread here as it's baking in the oven...looks sooo good! I love how it's just starting to develop that nice, golden brown color...it's about halfway through the baking time here.


And here's the finished product. Love the look of this bread!! To me, it "says" comfort. :)


I enjoyed my first piece warm out of the oven without any "accessories" like butter or jam. I could eat it plain like that anytime, but I have also had it with butter, jam, and even a touch of honey. Deeelish! I'd recommend toasting it for a few minutes too if you're eating it a day or two after the original baking. After toasting, it'll seem like it came right out of the oven! I hope you'll try making soda bread soon too...and please let the Barbershop know what you think of it!

Friday, March 12, 2010

Banana Soft Serve


Hello friends! "Long time" no post (long time = 5 days). Sorry about that! I hope you've had a good week. I wanted to share the latest dessert to come out of the Barbershop...but first, I have to warn you that it does not require any baking! And even crazier, it only requires one ingredient. ONE! :)  

Yesterday, my friend Jenn posted some fabulous ideas for easy, healthy snacks on her blog. One idea for a healthy snack was banana soft serve. I clicked on the link Jenn provided, and the title of the post from another blog was "This Post Will Change Your Life." That's pretty serious sounding, I'd say! With a title like that, I knew that I just had to try it. So tonight, I made my own banana soft serve by following
this recipe from a blog entitled "Choosing Raw."

Since I mentioned earlier that this recipe only requires one ingredient, and since the title of my post is "Banana Soft Serve," I bet you can figure out what that one ingredient is... BANANAS!! But, they must be frozen bananas, fyi. Here's what you do... :)

Take a few frozen bananas (tonight I used two), and put them in a food processor. I cut them up into 1-inch, or so, sized pieces first (didn't put the bananas in whole!). 


Turn on the processor and let it run for a minute or two, stopping to scrape down the sides every now and then. The recipe actually says to let the processor run for five minutes, but honestly, the soft serve looked to be the correct consistency after only about two minutes! 


So I actually ran it in 30-second increments or so, scraping in between each one. Perhaps the consistency would have been a bit lighter had I run the processor longer, but I really liked the consistency that mine was tonight! 


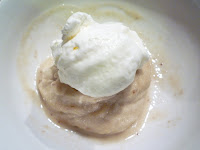
I only ate half since eating the whole batch would have meant eating two whole bananas, and I didn't need to do that tonight! I did, however, "dress up" the soft serve by adding a dollop of fat-free, sugar-free cool whip and a drizzle of Hershey's syrup.


Yummmmmm. Seriously. It was such a delicious, guilt-free treat!! I would HIGHLY recommend you try it...SOON. ;-)

Sunday, March 7, 2010

Healthy Homemade Vanilla Orange Granola


How good does that sound?! The first two words, healthy and homemade, are enough to capture me...but then you add vanilla, orange, and granola. Yum!!!! I've only made homemade granola once before, and that was pre-blogging. The first time I made it I used the recipe I'm about to share with you; luckily I saved it in my "Food & Recipes" folder of my email so that I could make it again! If you're a fan of granola, I really think you'll like this recipe. It is soooo darn easy, and it's also fun because it's the type of recipe that you can really make your own! There are endless potential ingredients to add to granola, so you might never actually make the same recipe twice. I like that...the Barbershop is all about switching it up and making a recipe your own! :)

Alrightie, down to business. Click here to see the recipe I followed. As you can see, the title of the recipe on the website is low-fat, low-sugar homemade vanilla orange granola. Ya gotta love the low fat and sugar! Even though I just provided the link to the recipe, I'll share with you the actual ingredients I used today. The measurements for everything but the vanilla and cinnamon are approximate...I didn't actually measure! The Barbershop is living on the edge... 

-3 cups old-fashioned oats
-1/4 cup flaxseeds
-1/4 cup wheat germ
-1/3 to 1/2 cup slivered almonds
-1/3 to 1/2 cup wildflower honey
-1/3 to 1/2 cup orange juice
-1/2 tsp. vanilla extract
-1 tsp. cinnamon
-1/4 to 1/3 cup raisins
-1/3 cup unsweetened flaked coconut


Preheat oven to 325 degrees. Combine the orange juice, honey, vanilla, and cinnamon in a small saucepan on the stove; heat over medium heat, stirring occasionally, until the honey has melted. Set aside.


In a large bowl, combine the oats, flaxseeds, wheat germ, and almonds. I did not add the raisins and coconut at this point.


Pour the orange-honey mixture over the dry ingredients, and stir well until the oats mixture is coated. Spread this mixture in a thin layer on an ungreased baking sheet (one with sides is helpful!).


Bake for 30 minutes, stirring at least once at the 15 minute mark. When there is approximately 10 minutes left of baking time, stir in the coconut and raisins.


I ended up stirring the granola three or four times during the baking. Using a pan with sides is helpful so that you don't lose any precious granola while you're stirring! Oh, and I also wanted to mention how amazing your kitchen will smell when you're making this granola... The orange, honey, and cinnamon cooking on the stove smell wonderful together, and then that delicious aroma continues as the granola bakes. You'd better prepare your nose for a pleasant experience with this recipe. :)


 Remove from oven and let cool. Store in an airtight container. 


Now, the next step is to enjoy the granola however you'd like! I chose to have an afternoon snack of some Dannon light n' fit vanilla yogurt with about 1/4 cup of granola mixed in, as you can see here. Deeelish! 


Maybe you'd like to eat your granola like cereal with some milk? How about sprinkling some on ice cream? Mmmm. Or, what about using it as your topping the next time you make apple crisp? Maybe you'd just like to snack on it as is! However you like to enjoy your granola, go for it.... :)

Other ideas for ingredients to include?! Craisins would be yummy, as would other types of dried fruit bits (pineapples, apricots, apples, etc.). Want to make your granola a bit sweeter? Try adding some chocolate or peanut butter chips at the very end of the baking... Switch up the nuts you use too; I chose to use almonds because I had them on hand, but maybe you'd prefer pecans or walnuts. Oh, sunflower seeds would probably be a yummy addition too! Remember what I said earlier? The possibilities are endless!

I almost forgot to mention that you should definitely check out the nutrition facts for this granola; they're listed online at the link I provided above. They allow you to enjoy this tasty treat without the guilt, and you're also getting some important nutrients at the same time! ;-)

Friday, March 5, 2010

Julie's Monkey Bread

Hi friends. I know you've been chomping at the bit, wondering what that second item was that I made for lab meeting this week! Ha, just kidding. :) From the title of this post you can tell that I made Monkey Bread!!! That is meant to be said in a very fast, excited manner...Monkey Bread!! This item is always a hit, believe me. I've made it several times before, but I actually have never used the recipe I'll share in this post, which is from my good friend from college, Julie. It's one of her signature dishes! In the past, I've used Cooking Light's Monkey Bread recipe. A month or two ago I had some friends over for board games, and Julie brought her famous monkey bread. I asked her for the recipe afterward, and now, here I am sharing it with you! At some point in the future I'll have to make the Cooking Light version again so that I can blog about that one too. The last time I made it was before the Barbershop blog was in existence!
Here is Julie's simple and delicious recipe. :)
-3 cans buttermilk rolls/biscuits
-1/2 cup sugar
-2 Tbsp. cinnamon
-1 stick butter (I used margarine)
-2 tsp. vanilla
-3/4 cup sugar
Cut the biscuits into quarters.
Place the biscuit quarters, 1/2 cup sugar, and cinnamon into a large ziploc bag and shake to coat.
Mmmm, love this close up of the biscuits, coated with delicious cinnamon and sugar.....
When coated, put into a greased bundt pan (the greased part is very important!).
Bring the stick of butter to a simmer on the stove, then add the vanilla. Slowly mix in the 3/4 cup of sugar until the mixture is smooth. Pour over the biscuits in the bundt pan.
Bake at 350 degrees for 30 minutes. Cool for 10 minutes and then flip onto a plate or platter. ENJOY!!!
Now, I have to admit that I was unable to fully remove the monkey bread from the bundt pan and invert it onto a plate. Sad... I greased the pan very well, but that wasn't enough! No matter how hard I tried, the entire thing wouldn't come out. I may have waited too long to try to invert it (I'm not sure how long I waited, but it was longer than the 10 minutes that the recipe instructs). So anyway, I don't have a pretty picture of the monkey bread to show you. Sorry! All I have is a couple views from above the bundt pan, as you can see above here and at the very top of the post. However, the image below is one that I stole from online. I can assure you that had mine been inverted, it would have looked like this one... ;-) I highly recommend making monkey bread the next time you're having people over for brunch or are heading over to a friend's place for any occasion really. It's a hit with adults and kids alike, I promise! There's something fun (and obviously super yummy!) about eating cinnamon-sugary balls of dough without any utensils. It's quite enjoyable! :)

Wednesday, March 3, 2010

Whole Wheat Apple Muffins

Well, I still don't have a dessert recipe for you...sorry! But I hope you'll still enjoy this post. :) I am on "bagel duty" for lab meeting at work this week, but every time in the past when I've been on bagel duty I've made something at home to bring instead. So this time was no exception! After browsing recipes for foooorever (which I always do), I decided I'd try these whole wheat apple muffins. I found the recipe on a blog I highly enjoy and have mentioned before, Smitten Kitchen, although the recipe is originally from King Arthur Flour.
Overall, it was a very easy recipe (Have you noticed a theme with me? I don't really do too many difficult recipes...but I blame my lack of time for that.). It also didn't call for any abnormal ingredients, which is another quality I typically look for in a good recipe! I was pleasantly surprised when I made 20 muffins out of this too, although I guess I wasn't too surprised since Smitten Kitchen said it made 18 muffins anyway. :)
I followed the original recipe almost exactly... The only changes I made were an addition of about 1/4 to 1/2 tsp. of cloves and the substitution of light vanilla yogurt for the buttermilk. That is all!
Here you can see the dry ingredients (notice the cloves vs. the cinnamon?!) and then the batter with everything but the apples mixed in.
I ended up using Cortland apples because I had bought some earlier in the week (they were the only kind of apples on sale!). Oh, and I also left the skins on the apples. The recipe called for skinning the apples, but I like the added color and texture of the skins!
Here they are, fresh out of the oven on the cooling rack!
Did you notice my St. Patty's Day muffin cups? Hard to believe March is here... One of my favorite holidays is just around the corner! I am rather Irish, after all... My name Colleen means "girl" in Gaelic. Can you get more Irish than that? ;-)
Stay tuned for my next post... It's going to be another breakfast item because I'm bringing more than just these muffins to lab meeting on Friday!

Monday, March 1, 2010

Oven Roasted Cauliflower

Greetings, friends... I realized that many of my recent posts have been about breakfast foods. How did that happen? Not sure! You might be asking, "where are the desserts?" I thought that's what the Barbershop was all about! Well, I am sorry to disappoint, but they're not in this post. I don't know anyone who would consider roasted cauliflower a dessert...not even close. :)
On our trip to the Dominican a couple weeks ago, I re-discovered my enjoyment for the vegetable cauliflower. I am guessing that it's not exactly one of the most popular veggies out there, but hey, someone's gotta like it! It does have some great health benefits...check them out here. Some of the highlights are its Vitamin C, folate, fiber, and low-calorie qualities. Gooo cauliflower!!
Okay, I'm a dork. I know. On to the recipe I go! This was really a super simple recipe, and now that I think about it, it's very close to my favorite roasted sweet potatoes recipe. After washing and patting dry the cauliflower florets, I simply put them in a glass baking dish, drizzled them with EVOO (extra virgin olive oil :)), and then sprinkled with some of my favorite herbs! This time around I used thyme, garlic powder, and basil. That is all! I baked them in a 425 degree oven for roughly 23 or 25 minutes, moving the florets around once in the pan half-way through that time. I was a good girl and ate these without any other additions, but I was thinking that a bit of parmesan cheese would be a tasty ingredient to try too! As for the herbs, the possibilities are endless...try whatever your favorites are! I was inspired by this particular recipe from Cooking Light, although I didn't follow it exactly. Below is a picture of some roasted cauliflower, among many other tasty veggies, on a salad I made for myself. Mmmmm...
Now, if you do happen to be one of those lucky few who does enjoy cauliflower, here are a few other tasty recipes that look tempting too....
-Mashed Cauliflower (a nice, low-carb alternative to mashed taters!)
-Cauliflower Soup (sound delicious to me!)
-Creamed Cauliflower (it's a Cooking Light recipe!)
I'll let you know if I try any of them! Oh, and one of these days I'll blog about a tasty dessert. I promise! Apparently the Barbershop is on a breakfast and/or veggie kick lately. ;-)