Showing posts with label dinner. Show all posts

Monday, March 19, 2012

Chicken and Sausage Quinoa Jambalaya

A few weeks ago we went to visit our friends who had recently had a baby. :) I browsed recipes quite a bit beforehand, trying to decide what to make for the dinner we were planning on bringing over and eating together. I have no idea why, but some notion got into my head to make jambalaya (I've never made it before). But as I read recipes and saw that most all of them called for rice, I wasn't too excited about making it with rice and began to wonder if anyone had ever made jambalaya with quinoa (I've been on a quinoa kick for quite some time). Such a silly thing to wonder; of course someone has made a quinoa jambalaya before! I had no trouble finding a delicious looking recipe on the web.

The recipe I loosely followed was this one for shrimp, sausage and quinoa jambalaya, from Relish, which is pictured here.

(photo source)

The ingredients I used to make this dish differed slightly, however, and are written below. All in all, this was very easy! And it was sooo good. We all loved it. In fact, we ate the whole dish! There were no leftovers to be had once the four of us got through with this. :) And I think it makes 8 servings... Guess we were all hungry!

In addition to just being plain yummy, the other great thing about this recipe is that it's quite versatile! You could make this completely vegetarian and add a larger assortment of veggies and maybe even some tofu? You could also add different meats or seafood (e.g., shrimp, of course!). And you can certainly kick it up a notch and add more heat/spice to this dish too, if that's your preference!

Ingredients:

-4 and 1/2 cups low-sodium chicken or vegetable broth, divided
-2 cups quinoa (I used white; you could use red)
-3/4 to 1 pound cooked sausage or kielbasa (it's your choice really as to what exact kind of meat!), cut into bite-sized pieces
-3/4 to 1 pound cooked chicken, cut into bite-sized pieces (you could roast, grill, saute, etc. the chicken - again, totally up to you)
-1 large onion, chopped
-1 medium to large green pepper, chopped
-1 medium to large red pepper, chopped
-4 cloves garlic, peeled and chopped
-1 15-oz. can diced tomatoes (the brand I used were "spiced" diced tomatoes)
-1/2 to 3/4 tsp. chili powder

Instructions:

Cook the 2 cups of quinoa with 4 cups of broth according to the quinoa package's instructions until it's done; set aside. Heat 2 to 3 tsp. of olive oil over medium heat in a large pot, and add the onion, peppers, and garlic to it. Saute about 10 minutes, or until the vegetables are tender. Add the remaining 1/2 cup of broth, can of diced tomatoes, and chili powder, and bring the mixture to a simmer. Add the cooked quinoa and the cooked meats, and mix everything together well. Heat a few more minutes, if necessary, until all ingredients are heated through.

Serve and enjoy!

As you can see, I don't have any pictures of this delicious dish to share with you. :( I was kind of in a rush when I was making it at home and I guess I wasn't thinking about taking pictures (which is really rare when it comes to me being in the kitchen; I am always taking pictures of what I make!). And I also didn't think to take pictures while we were eating. I blame the fact that I was distracted by the cute baby who was nearby... But, this dish was totally blog worthy, so I do wish I had snapped a few photos for you to see it. Oh well!

Instead, I'll show you a couple baby pictures. I definitely think that baby pictures are much more fun to look at than food pictures anyway! ;)


I can't stand the cuteness! Love being around little ones. :)


Mike's first time ever holding a baby this young and his first time feeding a baby! He looks like a natural, wouldn't you say?! 

Tuesday, February 28, 2012

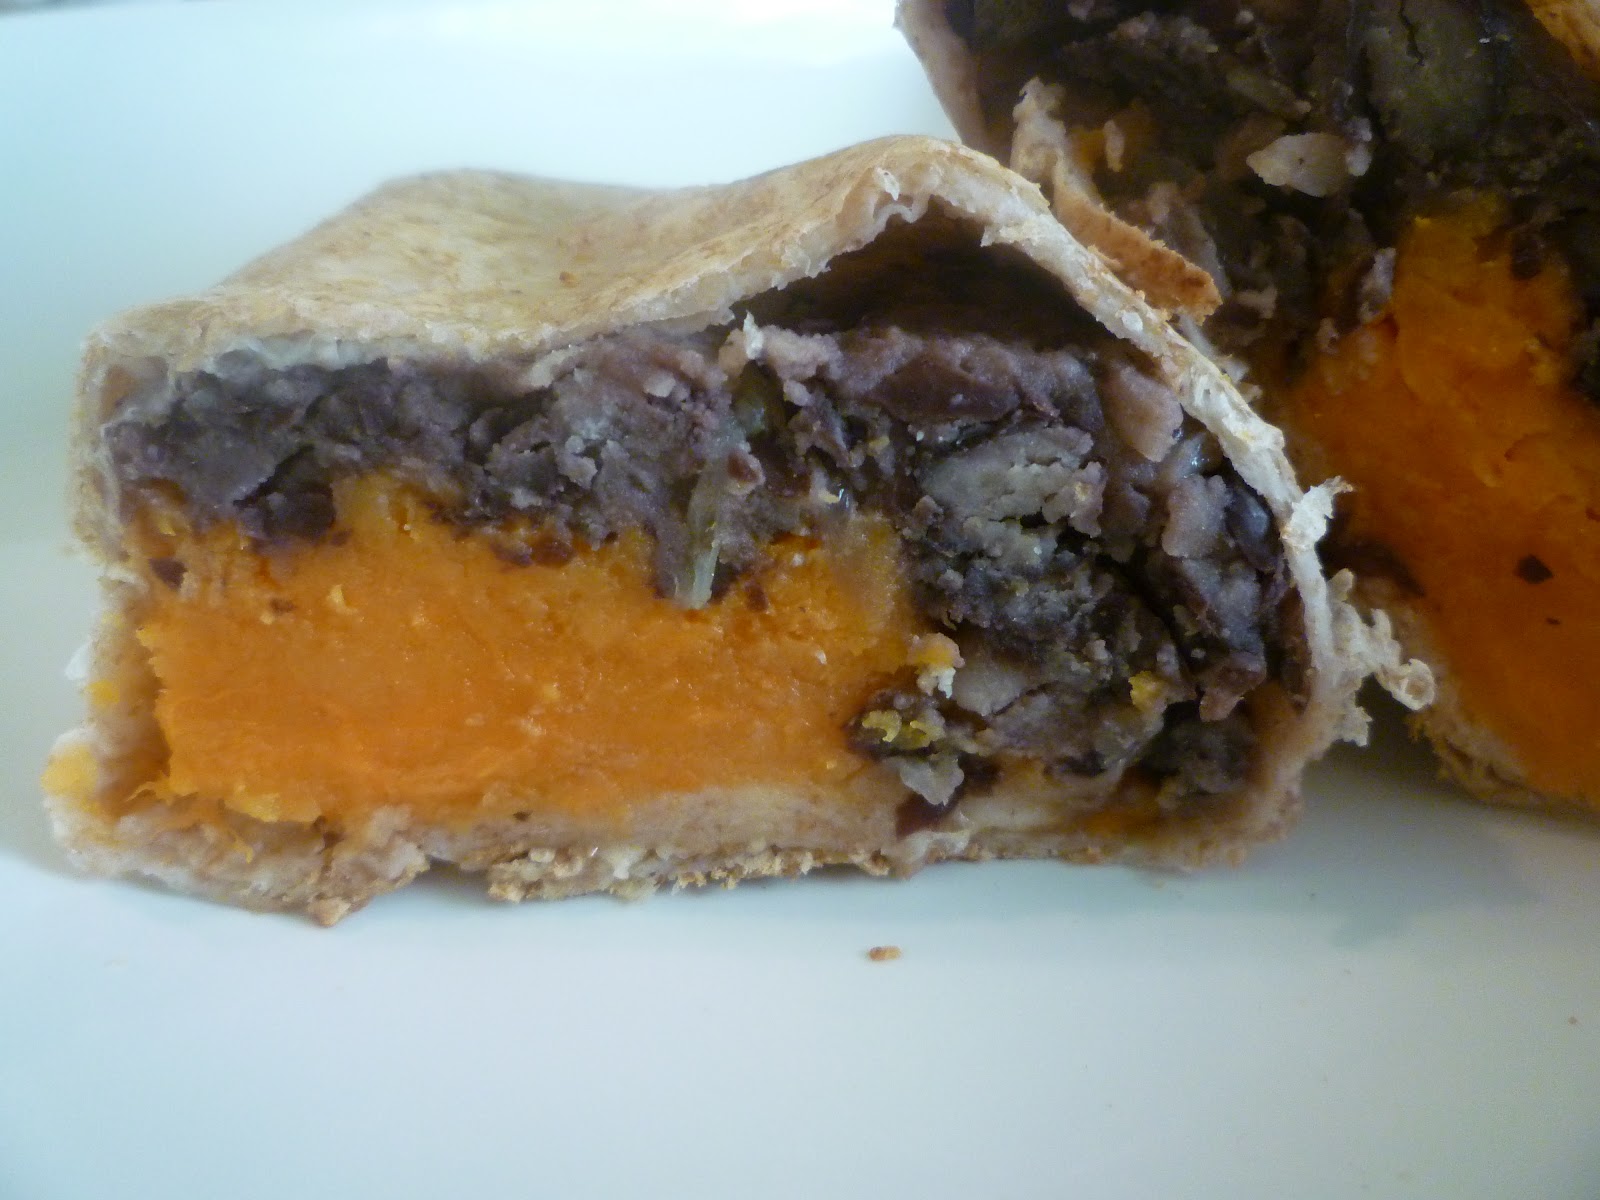
Sweet Potato and Black Bean Burritos


I cook several nights a week, sometimes by myself and sometimes with Mike. For a while now though, we've gotten into a routine of me cooking for us on Monday and Wednesday nights, as Mike works late on those evenings. Some nights when I'm cooking for the two of us, I take more time to make an "elaborate" meal (although, nothing I make is ever that elaborate!!). Then there are other nights when I use the extra time I have when Mike's still working to take care of "stuff." There's always so much to do! Go to the gym, do errands, and you know, just take care of all those random things that pile up... So, on those nights when I'm being super productive and my focus on cooking dinner takes up much less of my time and effort, I put together an easy meal like these sweet potato and black bean burritos. Simple, quick, healthy, and delicious! Love it. I made these last week on a night Mike was working late. It was a win-win; I still had lots of time to be productive and take care of things, and I was also able to get dinner on the table to feed my hungry fiance at 9 pm! :)


This recipe is adapted from The Novice Chef. The ingredients I used are below.

Ingredients:

-1 medium onion, finely chopped
-1 garlic clove, minced
-1/4 to 1/2 tsp. chili powder
-1/2 tsp. pepper
-1/2 tsp. salt
-1 15-oz. can black beans, drained and rinsed
-2 medium to large sweet potatoes, cooked and mashed (without skins)
-tortillas or wraps of your choice (I used 8-inch whole wheat wraps)
-sour cream
-fresh cilantro
-salsa

Instructions:

Preheat oven to 400 degrees. To prepare your sweet potatoes, you can do one of two things. You can bake them in the oven for about 45 minutes to an hour (bake them with the skins on, but poke some holes in the potatoes with a fork first). Or, you can do what I did last week when I made these... I microwaved my potatoes! Remember how I wanted to make an easy dinner and save time? Well, you can very easily microwave sweet potatoes too. Pierce them with a fork, and microwave each one for 6 to 10 minutes (depends on your microwave) until tender. Voila! Works just as well as baking them, and it's an especially easy method when you're using the sweet potatoes for a dish like these burritos. More specific instructions for microwaving sweet potatoes can be found here.

Once your sweet potatoes are cooked, use a fork or spoon to remove the inside and discard the skins. Place the sweet potatoes in a bowl and mash them with a fork.

To prepare the black bean filling, heat a teaspoon or so of olive oil in a non-stick skillet over medium heat. Add finely chopped onion and minced garlic to pan, and saute until they become slightly brown and translucent, about 4 to 6 minutes. Mix in the chili powder, salt, and pepper, and cook for 1 more minute before removing from heat.

In a food processor, pulse the black beans and onion mixture until smooth. Fill each wrap with about 1/3 cup of the black bean mixture and 1/3 cup of the mashed sweet potatoes. Roll the wraps into burrito shapes (I honestly had no idea how to do this, so mine looked like the picture you see above!). Grease a cookie sheet or baking pan, and place burritos on the pan. Bake for 15 minutes, until the inside of the burritos is nice and hot. 

Serve with sour cream, salsa, or any other toppings of your choice!


I chopped up some fresh cilantro and mixed it with sour cream for some added flavor. The outer edges of the burritos got slightly crispy as they baked in the oven. YUM!


These were extremely tasty! And they were light to eat, yet filling at the same time. Such a fun and easy weeknight meal. Even though they were meatless, Mike loved them too! But then again, he'd probably love any dinner I cooked him at 9:00 at night after a long day's work...

Wednesday, February 8, 2012

Homemade Calzones


As you may know if you're a regular follower of the blog, I'm a big fan of homemade pizza. It's definitely one of my all-time favorite homemade meals to make. It's so versatile and soooo yummy!! 

I've posted a few times about pizza in the past, including:


And I've even posted about a Breakfast Pizza, as well as a dessert style Candy Pizza!

So, I think you get the gist. I love pizza. ;)

Last week, however, I wanted to change it up. I was craving those typical flavors, but I didn't feel like doing the "same old" thing and make traditional pizza. So, of course, making calzones was the next best alternative! I've never actually made homemade calzones before, but I assumed it would be somewhat easy, and I didn't really follow a recipe for this...

I used a Stop n' Shop brand whole wheat pizza dough, divided it into two halves, and rolled each half out like I would if I were making pizza.

I baked a couple chicken breasts in the oven, one with bbq sauce and one with a plain tomato sauce.

Next, I sauteed an assortment of veggies, pictured here below (red peppers, onions, broccoli, and mushrooms). I believe I sauteed them in olive oil, and seasoned them with salt, pepper, and rosemary.


Next, Mike and I each built our own calzone. In mine, on one half of the dough, I first layered some of the already fully-cooked chicken breast, and I topped it with some more tomato sauce. I decided to cook both the chicken and veggies ahead of time because I wasn't sure how well they'd cook inside the dough.


Then I threw in some veggies; I just used the peppers, onions, and mushrooms in mine. Oh, and I added some chopped tomato too (which I did not saute ahead of time).


What's next? Cheese of course! I sprinkled some shredded mozzarella and grated parmesan on mine. When my fillings were all ready to go, I simply folded the other half of the dough over top of them.


(that looks like a lot of cheese, but it's not, I promise)

My and Mike's calzone's were a bit different in size. Oops! But who needs perfection when you're making calzones? Not me!


To seal the calzones, I just pressed the outside edges together with a fork.


How cute is my handsome fiance? ♥

I baked the calzones on my awesome pizza stone at 425 degrees for about 12 - 15 minutes, until they were lightly browned.


Apparently the dough of Mike's calzone was a bit thinner? That's my guess why his was more browned after baking.


Here's an inside shot of Mike's calzone. So good! In his, he put the bbq chicken, extra bbq sauce, all the different veggies, and an assortment of three cheeses (mozzarella, parm, and pepper jack!!).


And this was mine. Loved them both! We shared. I ate about 1/3 of mine and 1/3 of Mike's. I had intended to serve these with a side salad, but on this particular weekday I had already been busy in the kitchen for 2 hours before starting on the calzones, and to be honest, I just got too lazy and tired to prep all the veggies for a salad too. But that would have been the perfect accompaniment to these calzones!

The only thing I wish had happened was that the dough had risen more and was a bit thicker. It remained pretty thin, but that's ultimately okay. I'm not sure if I rolled it out too thin or if it maybe had something to do with the fact that this dough had been frozen and I had thawed it before using it? Not sure.

Either way, bottom line = I'd totally make calzones like this again! I'd also be excited to make an entirely veggie calzone without meat. Looove my veggies!

Monday, January 23, 2012

Chickpea Veggie Burgers


Tendonitis. Or, as I've seen it spelled, tendinitis (looks so odd that way though!). I have it. Not only do I have it in one place, but I have it in two. My wrist and my foot. :( The wrist tendonitis has been going on since early November, and the foot tendonitis only for a couple weeks, but it's become more severe over the past few days. If you've ever had tendonitis, you know how frustrating it can be. For the wrist, I've been wearing a brace, and for the foot, I've been icing and elevating it these past few days. No running for me! I am signed up to run a half marathon on February 19th, but I'm not so sure that's going to happen now...

Now, I suppose I should get to the point of why I'm telling you about my injuries before you get too bored or annoyed with me and my complaints. :) I suppose that one reason I'm telling you is to "vent" a bit. I'm a pretty active and busy person, so it's not necessarily the easiest thing to deal with injuries that slow me down (I keep telling myself it's a lesson to teach me to be more patient!). I am thankful for very good health overall though, and I realize this is just a bump in the road right now. Another reason I decided to share information about my current injuries with you is because they have limited, to an extent, the types and amounts of goodies I've been making in my kitchen. I have made an effort to scale back my cooking and baking, or at least try to make recipes that don't require too much extra effort on the part of my wrist (so, not a lot of chopping or twisting or stirring by hand or lifting of awkward pans - or whatever else you do in the kitchen while cooking and baking!). The hardest part of making these burgers for me was probably using the can opener to open the can of chickpeas! Otherwise, they were easy, and that's a reason I chose to make them. That, and well, they looked really yummy to me!

The recipe is from the wonderful blog, Daily Garnish. I adapted it slightly though. The original recipe can be found here, and the ingredients I used are below.

Ingredients:

-1/4 cup rolled oats
-1/8 cup sunflower seeds
-1 can (15 oz.) garbanzo beans (chickpeas!), rinsed and drained
-1 medium carrot, grated
-1/2 cup flat leaf parsley
-1 to 2 Tbsp. garlic hummus (or any flavored hummus)
-1 Tbsp. lemon juice
-1 Tbsp. olive oil
-1/2 tsp. minced garlic
-1/4 tsp. ground black pepper

Instructions:

Using a food processor, add the oats and sunflower seeds, and pulse until coarsely chopped. Grate a carrot and add it to the food processor. Add all the remaining ingredients, and pulse until mixture is roughly chopped, scraping the sides with a spatula a couple times. Be careful not to process too much, or the mixture will become too mushy.

Once mixed, transfer the mixture to a bowl and wet your hands. Form into four evenly shaped patties. Cook burgers over medium heat on a non-stick pan until they are browned on both sides.

Serve however you desire to eat them!


Of note, I used actual hummus in this recipe, but you may have seen on the original recipe that it calls for tahini. I had tahini, but I was a bit unsure as to its expiration date and whether it was safe to use still...so I just used hummus instead. Still worked fine!


I chose to enjoy my burger with some lettuce and tomato. Mike and I enjoyed these (yes, Mike really liked them even though he tends to be a meat guy!) on some whole wheat 100-calorie sandwich thins.


And we ate them with some delicious roasted blue potatoes on the side. My new potato obsession is blue potatoes. Love 'em! I buy them at our Whole Foods all the time...


I actually didn't put any condiments on my burger the first time I ate it because I wanted to taste it as is (and it's very flavorful!). But you could easily do ketchup, mustard, hummus, bbq sauce, etc...whatever your fav condiment is! You could add a nice slice of cheese too.


I brought one of the leftover burgers to work the next day for lunch. It was an awesome meal the next day too!


Since you lovely readers brought me good luck when it came to the Whole Foods pecan recipe contest, I'm going to ask if you don't mind sending me some more of that good luck of yours for my wrist and foot injuries...  I'm seeing a new specialist for my wrist this week, so hopefully we can make some better progress together. And as for the foot, well, for now, I'm trying to take care of it on my own by resting when possible, elevating and icing it, and taking some pain meds...but if need be, perhaps I'll see a specialist for my foot too. Either way, please send me positive "tendonitis go away vibes." Please and thanks. ;)

And on a completely different note, today, January 23rd, is National Pie day! This is ironic because I had a free pie delivered to my door today. What??!? I tried online grocery shopping with home delivery for the first time today through a Boston grocery store, Roche Bros. It was great! The only reason I tried it is because I had a great coupon for it. Anyway, for the first time you try their home delivery, you get a free apple pie! Yesssssss. I know what I'm having for dessert tonight!


Hope everyone's week is off to a great start!

Monday, January 16, 2012

Cooking Light Baked Potato Soup


Last week I mentioned that I'd have a delicious, hearty winter soup recipe for you. Well, I'm back and here it is! I made this baked potato soup a couple weeks ago on a cooooold weekday night, and it really hit the spot. I was inspired to make this recipe by my latest magazine issue of Cooking Light, which had a recipe for a "cheesy potato soup" in it. However, when I looked up reviews of that particular recipe online, the reviews were only mediocre. So I looked around for other potato soup options (I was really craving a potato soup for some reason and couldn't get the idea of making one out of my head!) and luckily stumbled upon this one that I ended up trying and loving.

The original recipe makes enough for 8 servings. I halved the recipe (more or less, it was probably more like I "5/8'd" the recipe ;)). So when I made this I had 4 or 5 servings. I have written the original recipe below for 8 servings. Feel free to alter it as you wish!

Ingredients:

-4 baking potatoes (about 2 and 1/2 lbs.)
-2/3 cup all-purpose flour
-6 cups 2% milk (I used 1%)
-1 cup reduced-fat shredded extra sharp cheddar cheese, divided
-1 tsp. salt
-1/2 tsp. freshly ground black pepper
-1 cup reduced fat sour cream
-3/4 cup chopped green onions, divided
-6 bacon slices, cooked and crumbled

Instructions:

Preheat oven to 400 degrees. Pierce potatoes with a fork and bake at 400 for 1 hour or until tender. Cool. Peel potatoes and coarsely mash.

Lightly spoon flour into dry measuring cups; level with a knife. Place flour in a large Dutch oven (or just a large, deep saucepan - whatever you have!); gradually add milk, stirring with a whisk until blended. Cook over medium heat until thick and bubbly (about 8 minutes). Add mashed potatoes, 3/4 cup of the cheese, salt, and 1/2 tsp. pepper, stirring until cheese melts. Remove from heat.

Stir in sour cream and 1/2 cup onions. Cook over low heat 10 minutes or until thoroughly heated (do not boil). Ladle 1 and 1/2 cups soup into each bowl. Sprinkle each serving with desired amount of cheese, onions, and bacon (the recipe says 1 and 1/2 tsp. cheese, 1 and 1/2 tsp. onion, and 1 Tbsp. bacon). Garnish with cracked pepper, if desired.


I used this Whole Foods brand of reduced sodium bacon. Use whatever your favorite kind is! Also, of note, I only added 1/4 tsp. of salt to the recipe. For 8 servings, the recipe calls for 1 tsp. of salt, which seemed like a lot to me, and halving the recipe means I should have added 1/2 tsp. salt, which still seemed like a lot. With soups, I tend to be conservative when it comes to adding salt to the actual recipe. I think it's better just to let each person who's eating the soup to add their own salt, if they want, to their individual bowl! :)


Mike and I enjoyed this soup with some toasted Whole Foods ciabatta bread. Simple and delicious.


Mmmmm, extra sharp cheddar. It makes everything better!


I really really liked this soup. It was slightly time-consuming to make, thanks to the need to bake the potatoes and cook the bacon. All in all though, it was not difficult and was totally worth any time and effort you put in to make it. And cream/milk based soups tend not to freeze very well, which is one reason I chose not to make the full recipe....if I had made the soup and had a lot leftover, I would have felt the need to either eat most of it within a few days or freeze the rest, and I didn't really want to do either. Also, I didn't want to use up 6 cups of milk for one soup! That's about all I had in my fridge when I made this recipe, so it was a better choice for me to halve the recipe and still have milk in the fridge for other uses.

And on a completely different note, isn't this a gorgeous sunset? This was a pic I took outside my apartment last week. Love those beautiful colors!!


And on yet another note, my cookie recipe won the Whole Foods pecan recipe contest!! Woohoo! I found out on Friday the 13th (my lucky day!) and was totally psyched. I'm planning another blog post about that, so please stay tuned! Thanks so much for your votes and support! :)


Monday, January 9, 2012

Baked Parmesan Tomatoes


Greetings! Sometimes you just need the simplest of simple recipes, wouldn't you agree? The majority of the time I really don't mind spending a little extra time in the kitchen to prepare a yummy, healthy dish. However, there are times when you're hungry, tired, cranky, or crunched for time (or all of the above!), and the last thing you want to do it make a dish with multiple steps or ingredients. The recipe I'm sharing with you today, baked parmesan tomatoes, is one of those easy and delicious recipes you can make in a flash and don't need to expend much mental or physical effort to make. :) This recipe wouldn't really serve well as a main dish, but if you wanted to use it as part of a meal, you could easily pair it with a simple salad, soup, or sandwich, or maybe pick up a rotisserie chicken at the store, and then you've got yourself a complete meal.

When I made this recipe a couple weeks ago, for me it was one of those, why haven't I ever thought of this before? It's something you'd think I could come up with on my own, but alas, I did not. I found the recipe at EatingWell.com. You can easily modify it too, depending on how many tomatoes you have, how many people you're cooking for, etc.

Ingredients:

-4 tomatoes, halved horizontally
-1/4 cup grated parmesan cheese
-1 tsp. chopped fresh oregano
-1/4 tsp. salt (I omitted the salt)
-freshly ground pepper, to taste
-4 tsp. extra virgin olive oil

Instructions:

Preheat oven to 450 degrees. Place tomatoes cut side up on baking sheet. Combine the cheese, oregano, salt, and pepper in a small bowl, and sprinkle evenly over the tomatoes. Drizzle with olive oil, and bake until the tomatoes are tender, about 15 minutes.


Oh, and I didn't have fresh oregano so I just used some dried herbs de provence that I had. Use whatever herb(s) you like! Basil would be great with this, I bet.


I actually added some shredded mozzarella, on top of the parmesan, to two of the tomato halves I made. I had mozzarella on hand that I wanted to use up, so this was a great way to use it.  


That one on the bottom left was a little overdone, but that's okay. Still tasted great!


Seriously, such a delicious and easy side dish! You've gotta give it a try!

Tomorrow Whole Foods is announcing the two finalists of the Pecan Recipe contest. Wish me luck! I'll keep you posted on how my pecan cranberry cinnamon chip cookies fare. ;)


Tuesday, December 20, 2011

Spaghetti Squash with Sauteed Vegetables and Kielbasa


I eat a lot of veggies. I loooove them. When Mike and I cook together, we tend to cook a lot of veggies, and I feel really lucky to be marrying someone who enjoys healthy, nutrient-rich foods like veggies! Sometimes we get in a rut though with our veggies... We most often roast veggies, and we also eat many of the same types of veggies over and over. Now, don't get me wrong; I'm not complaining! We still incorporate a large variety of veggies in our diet (and we especially did this with our awesome CSA this summer/fall!), but every now and then I realize our meals have become a bit redundant, and that's when it's time for a change. This time, spaghetti squash was that change! I've read other bloggers' recipes using spaghetti squash, but can you believe that I've never actually cooked it myself? Uh oh! So when I saw spaghetti squash on sale at Whole Foods last week, I figured it was about time that I gave it a shot. :)


The method I used to cook the squash was from Emeril on the Food Network. It's so simple (I didn't follow his entire recipe though - just the part for cooking the squash)! All I did was cut the squash in half lengthwise and put both halves, cut side down, in a baking dish with some water (about 1/2 inch of water in the bottom of the pan). Then I covered it in aluminum foil and roasted it at 400 degrees (although Emeril says 375) for about 45 minutes. When there was about 15 minutes left in the roasting, I flipped each half over so that the cut side was up, returned it to the oven covered with foil, and continued to roast it for the last 15 minutes. After the full 45 minutes, when I took the squash out of the oven and tested for doneness, it was perfectly tender and ready to go!


Here's the squash, straight out of the oven.


Make sure to discard the seeds!


To remove the squash from the peel, simply take a fork and pull the strands of squash (you know, the "spaghetti") away from the skin. It pulls away so easily! It was really fun to remove the squash. It was like popping bubble wrap or something. There was something really satisfying about it for some reason.


I peeled both halves all the way down to the squash's skin. I got every last strand of spaghetti, let me tell you!! I should have taken a picture of the empty skins. :)


To keep the meal super simple, we decided to just saute some other veggies and kielbasa (with olive oil and spices - herbs de provence, s & p) and put everything over top of the spaghetti squash.


Then we mixed it all together...


Added some cheese...


And voila, we have an easy, healthy dinner!!


 I like how you can see the strands of "spaghetti" here. :)


I loved my first experience of cooking spaghetti squash! If you're a spaghetti squash novice like I was until last week, I'd highly recommend it. If you're a fan of squash in general, you'll love it. It's so easy to cook and it tastes delicious too!! And if you're a pasta person but you're trying to cut back on carbs, this squash is the perfect substitute for actually spaghetti or any other pasta really!

I found a few other spaghetti squash recipes that look really healthy and tasty and have posted them below for you. YUM!!


I'll be back in a couple more days with my last Holiday Edition of Friday Favorites before Christmas! Be on the lookout early though; it may be appearing on Thursday. ;)

Hope you're all having a great week!