Monday, April 29, 2013

Snickerdoodle Bread


Quickbreads are one of my favorite baked goodies to make. They come together in no time (hellooo, they're not called quickbreads for nothin' ;)) and if you do it right, they can be very moist and flavorful. They're a fabulous option for breakfast or a snack...and sometimes, as with this recipe, they're also a great option for dessert. I give you permission to eat this bread whenever you want: morning, noon, or night. I won't judge. :)

This recipe comes from Barbara Bakes. I halved her recipe though, and the ingredients I used (to make one 9 x 5 loaf) are below. Feel free to double it though! That should yield you two 9 x 5 loaves or several mini loaves (you could also make this into muffins if you'd like!). I also changed the recipe slightly and I'll tell you what those changes are afterward.

Ingredients:

-1 and 1/2 cups all-purpose flour
-1 tsp. baking powder
-1/4 tsp. salt
-1 tsp. cinnamon (I used King Arthur Flour's Vietnamese cinnamon)
-1/2 cup butter, softened
-1 cup sugar
-2 eggs
-1 tsp. vanilla
-1/2 cup plain or vanilla yogurt
-3/4 to 1 cup cinnamon baking chips
-1 Tbsp. flour
-1 Tbsp. maple sugar OR cinnamon sugar mixture (1 Tbsp. sugar & 1 tsp. cinnamon) for sprinkling

Instructions:

Preheat oven to 350 degrees. Spray a 9 x 5 loaf pan with cooking spray. In a small bowl, whisk together the flour, baking powder, salt, and cinnamon; set aside. In a large mixing bowl, cream together the softened butter and sugar until fluffy. Add the eggs, one at a time, mixing well after each one. Mix in the vanilla and yogurt. Add the dry ingredients and mix until just combined; do not overmix. Coat the cinnamon chips in the tablespoon of flour, and stir into the batter. Spoon batter into greased pan. Sprinkle cinnamon sugar mixture evenly across top of the batter (or the maple sugar, depending on which you're using). Bake for 45 to 60 minutes (baking times will vary per oven) or until a toothpick or knife inserted into the center comes out clean. When done, let cool in pan 10 minutes before removing to let cool completely on cooling rack.


I am in love with cinnamon chips. No joke, I have about six bags of them on hand right now. So, when I saw this recipe, I knew I could make it right away. There's no shortage of cinnamon chips in my kitchen! In fact, I probably could have made 10 loaves of this bread with the cinnamon chips I have...


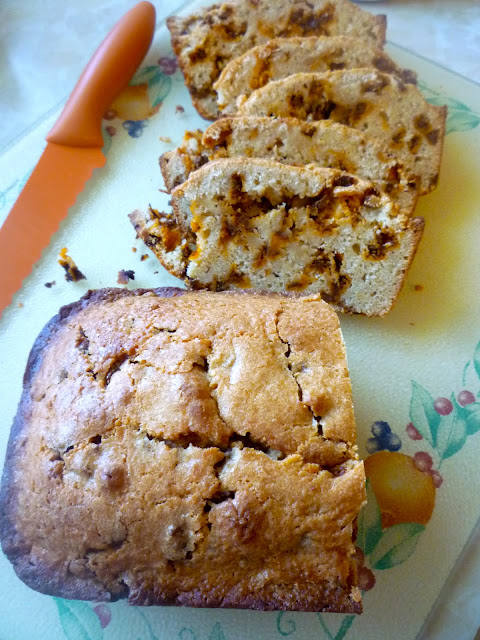
Notice the nice distribution of cinnamon chips throughout each slice of bread? Thanks to coating the cinnamon chips in flour before adding them to the batter, this nice even distribution is possible; they don't all sink to the bottom of the loaf. Woohoo!

Oh, and I almost forgot to mention it, but I used plain yogurt in this recipe, although the original recipe calls for sour cream. Either option will work just fine!

And I have to explain the whole maple sugar vs. cinnamon sugar on top of the loaf too... The original recipe calls for sprinkling a generous amount of cinnamon sugar on the loaf before baking. When I went to my cupboard to get cinnamon sugar (I have a jar of already made cinnamon sugar ready at all times - you never know when you might need it!), I saw my maple sugar in the cupboard. And I thought, hey, that could be good sprinkled on this bread! So I opted to use that instead of the cinnamon sugar. However, I did not add a full tablespoon of it to the top of the loaf. I used less... So, because of that, you don't see that nice layer of cinnamon sugar crunch that you see on Barbara's loaves. If that's what you're looking for, I would suggest that you use the full tablespoon of either option, the maple sugar or the cinnamon sugar.


I brought this loaf home to New York this past weekend to share with my parents and some other family members who were visiting. We enjoyed it as part of our Saturday morning brunch. It added just the right touch of sweetness to our plates! I also enjoyed a slice later on with some peanut butter spread on it. Boy, was that good too!!

This post is linked up to Taste and Tell Thursdays! :)

Wednesday, April 24, 2013

Easy Peanut Butter Yogurt Dip


I'm all about easy recipes this week. First, I give you homemade peanut butter. It's a recipe that can be made with only one ingredient. ONE. And now, I bring you another peanut butter recipe: peanut butter yogurt dip. I have to warn you though that there are more ingredients in this recipe than in the homemade peanut butter. Wait for it...

There are four ingredients in this one.

I know. So many!! ;)

There are a number of recipes around the web for peanut butter yogurt dip. After looking at a few, I settled on adapting a recipe from Nutritious Eats. This recipe actually only calls for three ingredients, but I added a fourth. So, this could be a three ingredient recipe if you want! I'll list the ingredients I used below and then will chat about ways you could change it up...

Ingredients:

-6 to 8 oz. plain or vanilla yogurt
-1/3 cup creamy peanut butter
-1/2 cup frozen whipped topping, thawed (e.g., Cool Whip)
-1 to 2 Tbsp. powdered sugar (optional)

Instructions:

In a medium bowl, whisk together the yogurt and peanut butter until smooth. Fold in the whipped topping. If this mixture does not meet your sweetness preferences, add powdered sugar until the dip is as sweet as you'd like it to be.

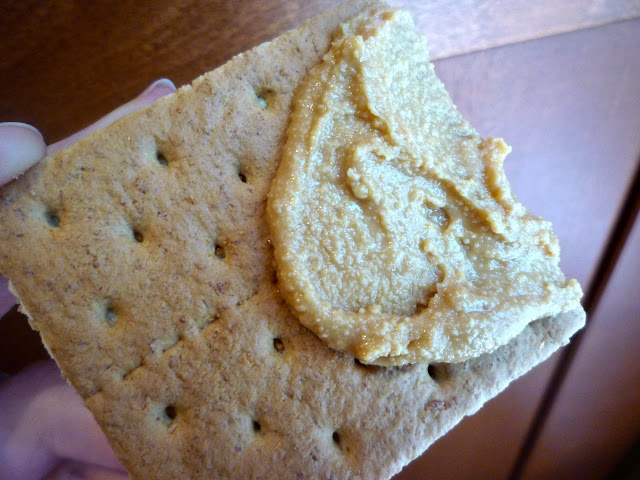
Serve with fruit (e.g., apples, strawberries, bananas), graham crackers, cookies, etc. Store dip in airtight container in fridge.


Could it get any easier?! Not really!

As I mentioned above, only add the powdered sugar if the dip isn't sweet enough for you. I used plain yogurt (this kind from Stonyfield), so I thought the powdered sugar would add just the right touch of sweetness, and it did. If you use vanilla yogurt, which tends to be a little sweeter, you may not need the powdered sugar.

I think it would be great to try this with Greek yogurt for an added protein punch! Greek yogurt would make the dip thicker too. The recipe in general is really so flexible. Add more peanut butter if you want it more peanut buttery. And more cool whip if you want it lighter and fluffier. Play around with it to see what you like best!


Although I don't have kids, this certainly seems like a great snack for kiddos, doesn't it?

And it's a great low-guilt dessert option too. I've definitely enjoyed some dip with a few strawberries and graham crackers the past couple nights for my dessert. :) 


The dip is very smooth and creamy, and it has a mild hint of peanut butter. The peanut butter taste is definitely there, but it's not overwhelming. You can easily increase the amount of peanut butter you add though to make that flavor really come through!


On a non-peanut butter note, I wanted to say that I will be scaling down on my blog posts going forward. I've never been a super frequent blogger (usually I post about three times a week). With a full time job and a busy schedule in general, blogging is a hobby for me that I enjoy on the side. I'm not doing it to make any money, and I don't have thousands of pageviews a day or a ton of comments from readers on each post. I really do enjoy blogging; it's a fun way to keep track of recipes and connect with other food lovers, but I just don't have the time I wish I had to be more devoted to my blog (nor do I have plans to make that time, at least not right now). So, I am likely going to be scaling down to just one or two posts a week. If you're a regular reader, thank you for stopping by as often as you do. It honestly means so much to me. Connecting with readers and knowing there are people out there who read my posts (and sometimes even make my recipes!) are my favorite aspects of blogging. There would likely be no "What's Baking in the Barbershop?!" if it weren't for you!

So, thank you. I really appreciate you. :)

Monday, April 22, 2013

Homemade Peanut Butter


Homemade peanut butter. It's so simple, yet I hadn't made it until now. What's wrong with me?!

This must honestly be one of the easiest recipes I've ever made.

It can be as simple as one ingredient. Peanuts. Yes, you heard me right! Salt and canola oil are optional, so there is potential for a whopping three ingredients total. ;)


Ingredients:

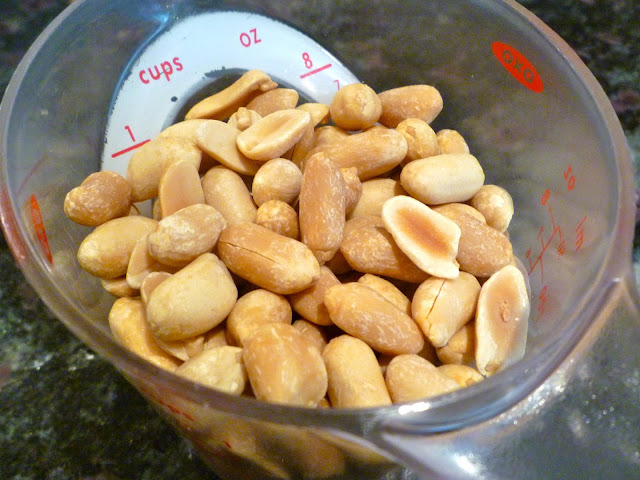
-1 cup roasted peanuts (unsalted, salted, or honey)
-salt to taste (optional)
-canola or peanut oil (optional)

Instructions:

Put peanuts in food processor. Process until creamy.

Ummm, that's it. No joke!

Now, a few more specific points for you...

It only took about 1 to 2 minutes for the peanut butter to reach desired consistency for me. Erin from Texanerin Baking says it takes about 4 minutes for her. So, just keep an eye on yours and check it every now and then to see how it's doing. When I tasted mine after no more than two minutes, it was great! Mike thought so too. So, I didn't process it any further. I think that in the future I will probably experiment a bit more and try to process it longer to see how that might differ.

If you think you'd like to try adding canola or peanut oil, add it one teaspoon at a time until the peanut butter reaches the consistency you'd like. And feel free to add salt to taste too.

And finally, 1 cup of peanuts makes about 2/3 cup of peanut butter. You can store it in an airtight container for up to two months in the fridge.


I used unsalted, roasted peanuts, and Mike and I both liked the taste of the peanut butter as is. However, I can see where adding a little salt would be yummy too!


When you first start processing the peanuts, they will become ground peanuts. As your food processor continues, the ground peanuts will form a ball. Next, they'll turn into a creamy, smoother product we like to call peanut butter! It seriously is like magic when it happens. :) I couldn't believe how quickly I went from peanuts to peanut butter!


Things like this make me so happy.

I'm such a simpleton. Peanuts turning into peanut butter...and I'm a happy gal. 


You need to try it if you haven't yet! I can't wait to experiment with more possible flavor combinations... Honey roasted peanuts, maybe an addition of cinnamon, perhaps some chocolate?! The possibilities seem endless! This homemade pb thing could be dangerous. :)

Wednesday, April 17, 2013

Boston

The tragic events at the Boston marathon this past Monday seem completely surreal. I actually woke up on Tuesday morning and thought I had dreamt what had happened. Something like that couldn't possibly have happened in this wonderful city I've called home for almost 9 years. But, it did.

The outpouring of love and support that we've received as a city has been amazing. And I completely in awe of the countless, selfless acts of kindness and heroism that have emerged in the past couple days. Each time I read something negative online about the events, thankfully, I am also able to find numerous positive stories. I've always known that Boston is full of kind, generous, and amazing people, but the events of the past couple days have reaffirmed that. I feel incredibly lucky to be a resident of this fine, strong, spirited city.

My heart breaks for the victims of the tragedy - those who have lost lives, those who have been injured, and all of their friends and family. I hope that everyone who might read this blog is safe and able to find comfort during such a sad time. I am praying daily for those affected, and I hope they can find the strength and support they need. Thank you so much to the everyone who has shown support for our wonderful city. These events will only make our Boston family stronger, I know.


Sunday, April 14, 2013

Chocolate Chip Cookie Cups


I love a classic chocolate chip cookie. I mean, who doesn't? But sometimes you need a little twist on an old favorite to keep things interesting. For me, that's the role that these chocolate chip cookie cups play. They are a great way to enjoy that chocolate chip cookie flavor that you love, but they're fun and different enough so that they're not the "same old thing." Although, sometimes of course, I do want that same old thing!

These cookie cups could not be any easier to put together. The dough comes together in about 10 minutes, and it's all in one bowl, without a mixer. And the recipe calls for normal ingredients that I'd put money on are already in your pantry. Woohoo!

The recipe for these cookie cups is from Averie Cooks, a blog that has so many amazing recipes. So many!! I pretty much want to make every recipe that she makes. :)

A few points to share with you... The recipe is going to have you brown the butter. Browning butter is pretty simple, so don't be intimidated by that factor! Browned butter adds such great flavor to a recipe; it adds an extra nuttiness and richness that really enhances the flavors of baked goodies. Also, the recipe calls for bread flour. If you do not have bread flour, don't worry. You can also use all-purpose flour. I ended up using a combination of the two when I made this. Averie recommends bread flour because it has a stronger rise and increases the chewiness of your goodies. Good to know!!

Ingredients:

-1/2 cup (1 stick) unsalted butter
-1 large egg
-3/4 cup light brown sugar, packed
-1/4 cup granulated sugar
-2 tsp. vanilla extract
-1 and 1/2 cups bread flour (or all-purpose, or a combination of the two)
-1/2 tsp. baking soda
-1/2 tsp. salt
-1 and 1/4 cups semi-sweet chocolate chips

Instructions:

Preheat oven to 350 degrees. Grease a 12-cup non-stick muffin pan generously with cooking spray. In a skillet or saucepan, melt the butter over medium-low heat, stirring almost constantly the whole time. The butter will melt, foam, turn clear, golden, then brown, and then will smell nutty. As soon as the butter begins to brown, remove it from the heat to prevent it from burning. Continue to stir for about a minute while off the heat. Set aside for a few minutes to let the butter cool so that when you add the egg to it, the egg won't scramble.

In a large mixing bowl, pour the butter. Add the egg, both sugars, and vanilla, and whisk to combine until smooth. Add the flour, baking soda, and salt, and stir until well-incorporated. Fold in the chocolate chips. Divide the dough evenly among the 12 muffin cups; each one will be about 2/3 to 3/4 of the way full. Bake for 9 to 11 minutes, or until the tops are lightly golden brown. Be careful not to overbake these, as they will firm up and be less chewy in texture if you do. After removing from the oven, let sit for 20 minutes in the pan. This seems like a lot, but it's very helpful when it comes time to take the cookie cups out. To remove the cups, you can try flipping the muffin pan over and they may come out easily. If not, use a rubber spatula to gently dislodge the cookie cups from the muffin pan. Cool completely and store in an airtight container for up to 5 days. You may also freeze these for up to 3 months. Makes 12 cups.


Another nice thing about this recipe is that you don't have to be fussy when you're dropping the dough into the muffin cups. The dough will spread and form to the shape of the pan. Easy!


Sorry for the poor quality of this picture, but I wanted to include it so you could see how the outer edges will look when the cookie cups are done. The outer edges will be firmer than the middle part, and they'll be a bit darker golden brown too.


I wasn't sure if the cups would come out of the muffin pan easily, but mine did! It was a breeze to get them out.


I really liked the texture of these cookie cups. They were extremely soft and chewy, and I'm guessing that had something to do with using bread flour! I don't think I'd ever think to do that, but what a great tip!


The amount of chocolate chips in this recipe was spot on as well. A good chocolate chip recipe has to have the right ratio of cookie dough to chips, right?!


I made the huge sacrifice of taste testing one of these so that I could take a picture of the inside of the cookie cup. You are welcome. :) It was tough, but someone had to do it!


Have a great start to your week, everyone!

Friday, April 12, 2013

Tuna, Avocado, Bacon, & Tomato Open-Faced Sandwich Melts


TGIF! ;)

In honor of one of the best days of the week (I mean, who doesn't love Fridays?!), I'm bringing you one of the easiest and best dinners I've put together lately - tuna, avocado, bacon, and tomato melts. Yeehaw! These are so easy and yummy. :)

Thankfully, the timing of the avocado I bought and the night I wanted to make these melts worked out well. I still haven't quite figured out buying and subsequently using avocados...sometimes I want to use them sooner than they're ready or vice versa. But anyway, it worked out perfectly this time around. Essentially, all I did with these melts was, on an English muffin, layer smashed avocado and canned tuna, then some tomato slices and a couple of slices of cooked bacon. Next came some sprinkles of cheese (of course), and then I toasted them in the toaster oven! So simple.

The ingredients below make two open-faced sandwich melts, enough for a nice lunch or a light dinner for you and someone else!

Ingredients:

-4 slices bacon
-2 English muffins
-1 medium avocado, pitted and peeled
-1 5-oz. can of tuna fish, drained
-1 to 2 plum tomatoes
-cheese (any kind!)
-salt and pepper

Instructions:

Cook four slices of bacon, on the stove or in the oven. Soak grease from bacon as much as possible using paper towels, and set bacon aside to cool. 

Drain the can of tuna. In a medium bowl, mix together the can of tuna and avocado, mashing the avocado and mixing the ingredients together with a fork or spoon. Add salt and pepper to taste.

Cut the English muffins in half. On each half, spread the avocado and tuna mixture until it is used up among the four muffin halves (if you have a little left over, eat it with a spoon; it's delicious!). Slice your tomato(es) until you have enough slices to cover the four muffin halves. Put down the tomato slices, followed by two half slices of bacon per muffin half. Top with cheese of your choice; you could use a slice of your favorite cheese, your favorite shredded cheese, goat cheese, etc. Place sandwich halves in toaster oven, and toast until cheese is bubbly and melted and the English muffins are toasted to your liking. Serve with a side of veggies or a side salad, if desired. Enjoy!!


I had a small spoonful of just the tuna and avocado mixture. Oh man! So good. I think I could just eat that for a meal! In fact, I'm sure it would make an excellent twist on a regular tunafish sandwich. Much like the avocado egg salad sandwich I posted a couple weeks ago, a tuna avocado sandwich would be delicious, I bet!


I will say that I probably could have added more cheese to mine, to really make it a melt. When I picture a sandwich melt, I picture more ooey, gooey melted cheese than what I had on mine. So feel free to "go crazy" with the cheese if that's what you like!


Also, after I originally cooked the bacon, it was already pretty crispy. Then when I put the sandwiches in the toaster oven, I think the bacon crisped up a bit more; hence, the semi-burnt edges you see in the pictures. I like my bacon crispy though, so it was okay with me!


I'm definitely going to keep this in our rotation of weeknight dinners. It's so simple, mostly healthy, and delicious. The most lengthy step of the recipe is cooking the bacon; everything else really comes together in about 5 minutes!

And if English muffins aren't your thing, these open-faced melts could easily be made with regular bread, pita bread, etc.


This sandwich could easily be made meatless by omitting the bacon. And you know what addition would make it eggcellent, I bet? A fried egg! Boy, does that sound good...kinda like a few months ago when the hubs and I made grilled cheese sandwiches with bacon, egg, and tomato.


I already can't wait to make these again. :)

Wednesday, April 10, 2013

Wedding Wednesdays: Registry Items We're Loving

 Hi! I thought I'd share something fun and different today for Wedding Wednesday - registry items we received for our wedding that we love! When I'm considering buying an item for the kitchen or the home, I spend a lot of time reading online reviews of items, if they're available. And I love talking to other people about products they have and enjoy. Hearing a friend or coworker recommend a product first-hand trumps any review I might read online! So, I thought it could be fun to share with you some of the products that Mike and I are loving right now that we received as gifts from our generous friends and family. And if you're in the market for any of the types of items listed below, I'd highly recommend any of these. If an item is listed here, we're lovin' it. ;)

I mainly stuck to kitchen-specific items since this is a food blog after all. :) I did sneak in one non-food item though because it's just so awesome not to share!

We received the following items from our registry on Bed, Bath, & Beyond. However, some of these may be available at other stores.


(photo source)

These knives are terrific! We have used them for steak and other meats like chicken. They are very light, comfortable to hold, and they cut extremely well.


(photo source)

This is such an easy wine opener to use! I am quite possibly the world's worst wine bottle opener (maybe it's because I typically stick to beer ;)), but even I can open a bottle easily with this guy! It's great.


(photo source)

Can't say enough about these Pyrex containers. We use them all. the. time.


(photo source)

This too! This cutting board is used daily in our house. And we really do use it to "chop and scoop"! It's perfect for carrying cut-up veggies over to a pan on the stove. And it is easily cleaned up right in the dishwasher.


(photo source)

This may sound strange, but I never thought I could love a dish rack as much as I love this one. Seriously. It's my favorite!


(photo source)

We loooove these containers. Right now I have several of them filled with baking ingredients (flour, sugar, etc.) and other pantry staples like almonds, quinoa, etc. 


(photo source)

Here's the one non-kitchen item I mentioned earlier. This vacuum is amazing! It's SO light and easy to use. And it works wonderfully! I'm embarrassed to say that we had no idea how dirty our rug was until we took this vacuum to it and saw how much dirt it removed! Can't recommend this one enough.

(photo source)

This pan is fabulous. It is wonderfully non-stick AND it is a breeze to clean. Love it!

And the following items are from Crate & Barrel!

(photo source)

We love this slate board! We use it often to serve cheese and crackers. It's fun and unique - different than a typical cheese plate or platter.

(photo source)

Another great pan. This is our first taste of the cast iron world, and we love it!


(photo source)

I have to say that I had never had biscuit cutters until we received these for the wedding! And I have really enjoyed using them so far. The smaller cutter was a perfect size for my herbed buttermilk biscuits.


(photo source)

Where do I begin? We adore this juicer, and we're so glad we chose to add it to our registry. We weren't sure if we were going to get into juicing, so we went with a less expensive model (there are some expensive juicers out there!). But it's just perfect for us. We enjoy juicing fairly often and have loved experimenting with new flavor combinations. I can't say enough about this juicer! If you're uncertain about diving into juicing, I'd really recommend trying out this Breville juicer as a great place to start.


(photo source)

Everyone needs a good, quality set of knives, right? Well, we have ours now! These are such nice knives, and we love them (sorry; I'm really overusing that phrase, "we love them" with all these products). It's amazing what a difference a good quality knife makes!

(photo source)

Now, I have to admit that I have yet to use this cake stand! But it's one of my favorite registry items because I am so excited to use it when the right occasion comes along!

(photo source)

Unfortunately, this item isn't available on Crate and Barrel anymore. But it's an amaaazing knife! It's the best bread knife ever. Really. If you ever see it sold elsewhere, GET IT.

We also love the glasses and dishes set we received. We got a couple sizes of Crate and Barrel's Otis glasses and we got the Roulette style dishes. We're very happy with those choices!


                                                                 (photo source)                                                   (photo source)

Ultimately, we were completely happy with all of our registry items. I could have selected many more items that we love to share with you here! We took great care to research items ahead of time as much as we could, and thankfully, that research paid off. We are so grateful to our amazing, generous friends and family for showering us with such wonderful gifts that we will use for years to come. I love using a registry item and thinking of the person who gave it to us...always makes me smile. :)