Showing posts with label easy. Show all posts

Thursday, March 15, 2012

Banana Date Smoothie


With this unseasonably warm weather we've been experiencing lately in New England, I've been craving refreshing smoothies. However, I'm not quite ready for berry-flavored smoothies yet. Thankfully there are a gazillion other smoothie combinations out there though! So when I stumbled upon this banana date smoothie the other day from Steph's Bite by Bite, I immediately pinned it. And since then, it's been on my mind quite a bit (don't get jealous, Mike!!). And this past Tuesday I finally got around to making it. And then I made another one on Wednesday. Annnnd, you guessed it. I made another one today, Thursday. Uh huh. It's gooood. 

As I mentioned earlier, I first saw this recipe on the lovely blog, Steph's Bite by Bite. The proportions and ingredients listed below are what I used and are just slightly modified from the original recipe. This makes one serving.

Ingredients:

-1 medium to large banana, frozen
-1/4 cup dry regular oats
-3 pitted dates, chopped/sliced
-1/2 cup milk (I used organic 1%)

Instructions:

Place all ingredients in a blender. Blend until everything's mixed together and fairly smooth.

Of note, the original recipe does call for a few ice cubes. Mine turned out plenty cold (for my liking) with just the frozen banana and cold milk. But feel free to add ice cubes if you'd like! It may "bulk" up the smoothie a bit too, if you add the ice.


A trick to make this easier? Slice your bananas before freezing them. If you have a super duper fancy blender you may be able to just throw a whole frozen banana in there, but my blender isn't that great so it works better for me if I slice the bananas before I freeze them. I also chopped up the dates into smaller pieces before adding them to the blender.


On one of the past three days I made this smoothie I was on the run, going from one thing to another. So, I put it in a handy dandy little to-go cup that works great for smoothies and shakes!


Another picture of ingredients in the blender; this was smoothie day #3.

If you need a reminder about how good dates are for you, read all about them here. I looove dates! If you're a regular reader, you already know this. I've mentioned my obsession with dates when I've baked with them (recently with maple date scones and a little while back with maple date bars). And I feel like every time I make something with dates, I talk about how obsessed with them I am. Guess that really just confirms the obsession!!


After blending...bubbles!


Yep, I drank my smoothie out of a wine glass. :)


If you love smoothies, especially healthy ones, go make this one! Deeeelicious.

Tuesday, March 13, 2012

Cookies & Cream Brownies


I'm pretty sure that my coworkers have a love/hate relationship with me. Once every week or two, I bring in some sort of baked goodie to the lab "just because." I'll bake for coworkers' birthdays and special occasions too (as I've mentioned on the blog multiple times!), but sometimes, just because, I'll make something to bring to work. It really all comes down to the fact that I just love baking and even if I don't have a particular occasion to bake for, you'll still find me in my kitchen baking a delectable batch of cookies, bars, or cupcakes. And then I bring them to work. And that's where the love/hate relationship happens.

When my coworkers see me coming toward them with a big tupperware full of treats in the hours after lunchtime, they love me. They've just finished lunch and are craving something sweet. Don't you worry; it's the Barbershop to the rescue for your afternoon sweets craving! But then, as they're taking that cookie or brownie from the tupperware, they're mumbling "Oh Colleen, why do you do this to us? I'll have to work out longer at the gym tonight." And that's where the "hate" part of the relationship comes into play.

Sorry, guys. I just love to bake and you can't stop me. :)


The two products pictured here went into these cookies and cream brownies - Heads or Tails Oreos and Hershey's Cookies n' Creme Eggs (which are only around at Easter time!).


You may remember these Oreos back when I made Oreo Stuffed Chocolate Cupcakes. I had yet to finish the package of Oreos (I know; what's wrong with me?!), so I decided to chop them up and put them into brownies. Obviously.


And I also just happened to have on hand these delightful little cookies and cream flavored egg-shaped candies. So, again quite obviously, I chopped those up to put in the brownies too. And that's how this new creation of cookies and cream brownies was born!


And then I brought these babies to work.

Uh oh.


Ingredients:

-1 cup semi-sweet chocolate chips
-1/2 cup (1 stick) unsalted butter
-3 large eggs
-1 and 1/4 cups all-purpose flour
-1 cup granulated sugar
-1 tsp. vanilla extract
-1/4 tsp. baking soda
-10 Oreos, chopped (can be any flavor you'd like)
-24 Hershey's cookies n' creme eggs, divided into two groups (16 eggs and 8 eggs) and chopped

Instructions:

Preheat oven to 350 degrees. Grease a 13 x 9 baking pan. Chop the Oreos into 1/4 to 1/2-inch sized pieces (I usually got about 6 to 8 small pieces out of each Oreo). This should yield approximately 1 cup of chopped Oreo pieces (and make sure to use every last crumb of the Oreos!). Next, chop the first group of 16 Hershey's eggs into pieces. This will be a little trickier, and there's no strict measurement for how big these pieces will or should be. Just chop them however you'd like them! Set those 16 chopped eggs aside (this should equal about 3/4 to 1 cup). Finally, chop the remaining 8 eggs and set aside to sprinkle on top of the brownie batter just before baking.

Melt the 1 cup of chocolate chips and stick of butter over low-medium heat on the stove in a heavy duty saucepan (I use a 2-quart pan with this recipe). Stir the chocolate and butter until smooth. Remove from heat and stir in the eggs. Add the flour and mix well, followed by the sugar. Again, stir well and then add the vanilla and baking soda, mixing well. Next, stir in the chopped Oreos and the group of 16 chopped Hershey's eggs. Spread batter evenly into the prepared pan, and sprinkle with the remaining 8 chopped eggs.

 Bake for 18 - 22 minutes, or until a toothpick inserted into the center comes out clean. Cool completely and cut into bars. Makes approximately 24 - 30 bars, depending on the size of the bars that you cut.


Ooey gooey cookies and cream chocolatey brownie deliciousness. :)


The Oreos definitely added a slight crunchy texture to the brownie. And the Hershey's eggs plus the cream filling of the Oreos added that creamyness to truly make these cookies and cream brownies.


Now, tell me your opinion. Is it cream or creme?! I have no idea and feel like I've seen it both ways, so I just went with cream.

Either way, cream or creme, these brownies taste the same (you know, amazingly delicious) and that's all that matters.

:)

Tuesday, February 28, 2012

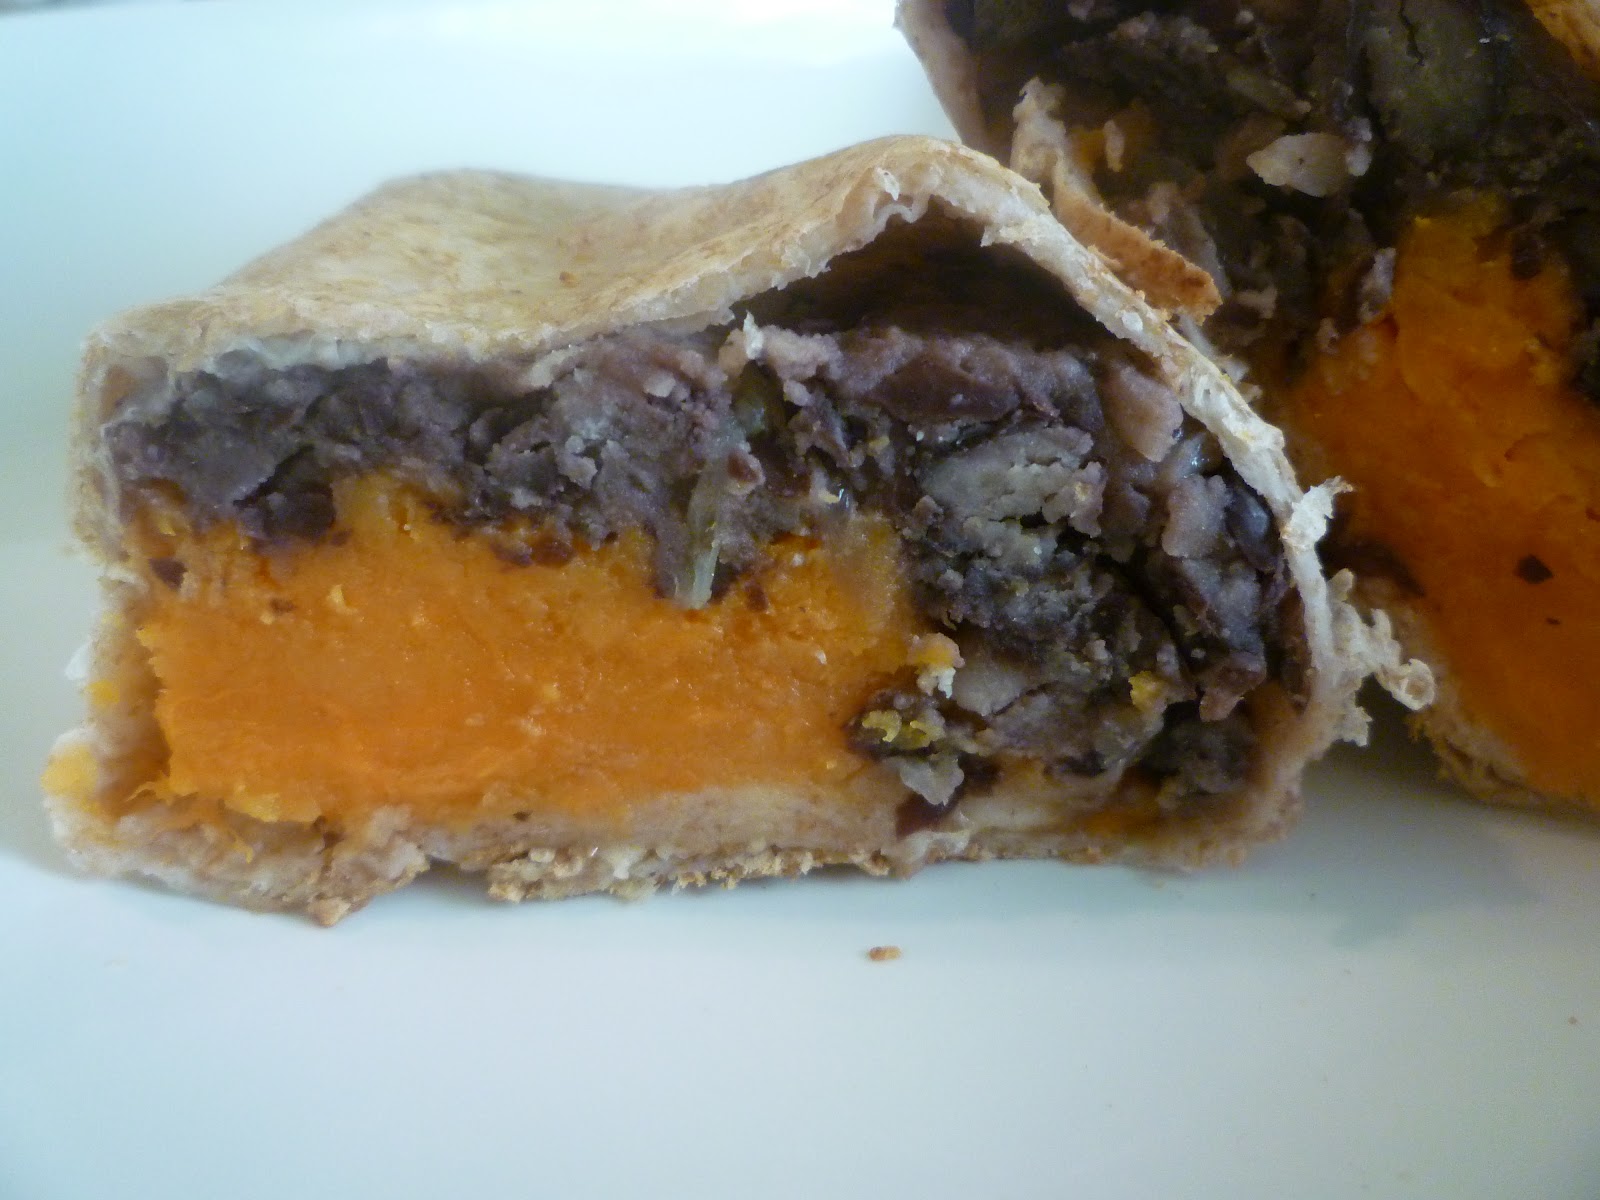
Sweet Potato and Black Bean Burritos


I cook several nights a week, sometimes by myself and sometimes with Mike. For a while now though, we've gotten into a routine of me cooking for us on Monday and Wednesday nights, as Mike works late on those evenings. Some nights when I'm cooking for the two of us, I take more time to make an "elaborate" meal (although, nothing I make is ever that elaborate!!). Then there are other nights when I use the extra time I have when Mike's still working to take care of "stuff." There's always so much to do! Go to the gym, do errands, and you know, just take care of all those random things that pile up... So, on those nights when I'm being super productive and my focus on cooking dinner takes up much less of my time and effort, I put together an easy meal like these sweet potato and black bean burritos. Simple, quick, healthy, and delicious! Love it. I made these last week on a night Mike was working late. It was a win-win; I still had lots of time to be productive and take care of things, and I was also able to get dinner on the table to feed my hungry fiance at 9 pm! :)


This recipe is adapted from The Novice Chef. The ingredients I used are below.

Ingredients:

-1 medium onion, finely chopped
-1 garlic clove, minced
-1/4 to 1/2 tsp. chili powder
-1/2 tsp. pepper
-1/2 tsp. salt
-1 15-oz. can black beans, drained and rinsed
-2 medium to large sweet potatoes, cooked and mashed (without skins)
-tortillas or wraps of your choice (I used 8-inch whole wheat wraps)
-sour cream
-fresh cilantro
-salsa

Instructions:

Preheat oven to 400 degrees. To prepare your sweet potatoes, you can do one of two things. You can bake them in the oven for about 45 minutes to an hour (bake them with the skins on, but poke some holes in the potatoes with a fork first). Or, you can do what I did last week when I made these... I microwaved my potatoes! Remember how I wanted to make an easy dinner and save time? Well, you can very easily microwave sweet potatoes too. Pierce them with a fork, and microwave each one for 6 to 10 minutes (depends on your microwave) until tender. Voila! Works just as well as baking them, and it's an especially easy method when you're using the sweet potatoes for a dish like these burritos. More specific instructions for microwaving sweet potatoes can be found here.

Once your sweet potatoes are cooked, use a fork or spoon to remove the inside and discard the skins. Place the sweet potatoes in a bowl and mash them with a fork.

To prepare the black bean filling, heat a teaspoon or so of olive oil in a non-stick skillet over medium heat. Add finely chopped onion and minced garlic to pan, and saute until they become slightly brown and translucent, about 4 to 6 minutes. Mix in the chili powder, salt, and pepper, and cook for 1 more minute before removing from heat.

In a food processor, pulse the black beans and onion mixture until smooth. Fill each wrap with about 1/3 cup of the black bean mixture and 1/3 cup of the mashed sweet potatoes. Roll the wraps into burrito shapes (I honestly had no idea how to do this, so mine looked like the picture you see above!). Grease a cookie sheet or baking pan, and place burritos on the pan. Bake for 15 minutes, until the inside of the burritos is nice and hot. 

Serve with sour cream, salsa, or any other toppings of your choice!


I chopped up some fresh cilantro and mixed it with sour cream for some added flavor. The outer edges of the burritos got slightly crispy as they baked in the oven. YUM!


These were extremely tasty! And they were light to eat, yet filling at the same time. Such a fun and easy weeknight meal. Even though they were meatless, Mike loved them too! But then again, he'd probably love any dinner I cooked him at 9:00 at night after a long day's work...

Monday, February 20, 2012

Hershey Kiss Pretzel Bites


Hello! Do I have an easy recipe for you. This recipe for Hershey Kiss Pretzel Bites is actually a variation on a "classic" - Rolo Pretzel Bites. I've seen the Rolo ones quite often, and I've made them too but that was quite some time ago. Thankfully I recently remembered them though! A few weeks ago I wanted to make a super simple and yummy sweet treat to enjoy with friends as we watched the Super Bowl. I didn't have Rolos on hand, but I did have Hershey Kisses! And so, the Hershey Kiss Pretzel Bites were born.


You can make these with the Snap pretzels like I have here, or you could just use regular mini pretzels.

Preheat your oven to about 300 degrees. Top each pretzel with one candy of your choice, a Hershey Kiss or a Rolo.


Bake in the oven for only 3 - 5 minutes, checking on them after 3 minutes. Basically you just want the candies to become slightly melty, like these kisses below.


While they're in the oven, make sure your "toppings" are all ready to go. A popular topping with Rolos is pecans, as you see here:


(photo source)


I decided to top mine with almonds and dark chocolate m&m's. I specifically picked out the red and blue ones from the bag since the Giants and Pats were playing in the Super Bowl! And on a side note, woohoo for the Giants winning!


Okay, back to business. Right when you take the pretzels out of the oven, immediately press one (or two) m&m's, or an almond, or whatever you're using, down in the center of the Hershey Kiss. And that's it! Let them cool completely, and store them in an airtight container. As you can see above, on some of these I put a pretzel m&m. :)


This would be a great recipe to involve the kids too! They could easily help with placing the kisses on the pretzels or the m&m's/nuts on top of the kisses once they're out of the oven. Be careful though as you eat these... You should know that it's really hard to eat just one.

:)

Sunday, February 19, 2012

Two Favorite Snacks: Apple Slices with Honey & Cinnamon and Ooey Gooey Banana & Peanut Butter

I love snacking. I typically eat a little bit every 2 to 3 hours during the day, so many of the times I'm eating I would consider what I'm eating to be a "snack" rather than a meal. My lunches are more meal-like, but they tend to be small, and during the week at work you can often find me having a snack about two hours after I've eaten lunch.... And then I also often have a snack when I get home from work...and in the mid-morning I have a snack. So, you see, I snack a lot. ;)

For fun, I thought I'd share with you a couple of my current, favorite snacks. I sometimes go in cycles; I have a particular snack that's my favorite for a few months, and then eventually I change it up and have another favorite go-to snack for a while. Well, currently my two favorites are apple slices with honey and cinnamon and a warmed, mashed banana mixed with peanut butter. Let me explain!

Perhaps some of you enjoy apples like this too. For my sliced apple snack, I simply cut up an apple, drizzle it with a bit of honey and then sprinkle a little cinnamon on top. Delish!! I also love apples plain, but every now and then I'm in a mood to eat them differently, so that's when this apple, honey, and cinnamon snack comes into play. Such a great combo.


And for the past few weeks, at least two or three times a week, I've been having an ooey gooey banana and peanut butter snack. If you love the flavor combo of banana and peanut butter (and let's be serious - who doesn't?!), you'll love this. Generally, I cut up either half a banana or a whole one, depending on how hungry I am, and I put the banana slices in a mug. You could also do this in a bowl but it's more fun in a mug for some reason. Then I add about two teaspoons or so of peanut butter to the mug and pop it in the microwave. The first amount of time I "nuke" it for is usually 30 seconds and depending on the ripeness of the banana, sometimes it needs another nuking of about 15 more seconds or so. Usually after a total of 45 seconds, the banana and peanut butter are plenty warm, and the banana has become mushy and soft. I stir everything together and eat it by the spoonful! Soooo good. I personally think this snack is better with bananas that are on the riper side (i.e., have some brown spots on them). One time last week when I needed a more substantial snack to last me a few hours until I would be eating dinner, I enjoyed the warmed, mashed peanut butter and banana on a toasted 100-calorie whole wheat sandwich thin. Also delicious!! This weekend I had a whole banana with some peanut butter (warmed up and mashed together, of course!) before I went to the gym to take a Turbo Kick class. It was the perfect fuel to get me through a tough workout!


It doesn't look all that appetizing, but trust me, it's delicious. And it's so fun to eat out of a mug!


This was when I spread the deliciousness on a toasted whole wheat sandwich thin.


What are some of your favorite snacks that are on the healthy side and don't take much time to prepare? I'd love to hear them. Perhaps you have an idea that will become my next go-to snack once these two are out of the rotation! :)

Tuesday, February 14, 2012

Chocolate Chunk Toffee Bars


Last Tuesday night I panicked. At the last minute, I remembered that I had committed to baking some kind of homemade treat for an occasion the next day, but I had completely forgotten about it! Oops. Luckily, the occasion didn't require anything fancy. If it had, I definitely think I would have been less likely to forget. Thankfully I remembered my obligation to make something, and thankfully it only took about 30 seconds for me to decide what to make. My chocolate chip graham cracker blondies are one of the simplest and fasted desserts to make, and the ingredients are ones that I always have on hand. So, I got to work making them! This time around though, I changed the recipe slightly (which is so easy to do and a great feature of this recipe!) to add chocolate chunks and toffee bits instead of the original chocolate chips and crushed graham crackers that I added when I first made these. Below are the ingredients I used this time around. Feel free to add different mix-ins to match your own personal preference!

Ingredients:

-2 sticks (16 Tbsp.) butter, melted
-2 cups brown sugar (I used light brown sugar)
-2 large eggs
-2 tsp. vanilla
-pinch salt
-2 cups all-purpose flour
-1/2 tsp. baking powder
-1 and 1/4 cups semi-sweet chocolate chunks
-1 cup Heath English toffee bits

Instructions:

Preheat oven to 350 degrees, and butter or spray a 13 x 9 pan. Mix the melted butter with brown sugar, and beat until smooth. Beat in eggs and then vanilla. Add the salt, and stir in the flour and baking powder. Mix in your additions (chocolate chunks, toffee bits). Pour into your prepared pan. Bake at 350 degrees for 20 - 25 minutes, or until the middle is set and a toothpick comes out clean. Let cool completely before cutting.


Now these first few pictures I took basically as soon as the bars were just cool enough to remove from the pan. So you can definitely tell how warm, ooey and gooey (i.e., slightly undercooked!!) these are. It's my own preference to undercook them a bit, but you can cook them a couple minutes longer if you'd like. The pictures toward the bottom (when the blondies are on the pink plate) are the next day. The gooey-ness goes away slightly, but they're still very soft and yummy. :)


Mmmmmm...


The next time you need a dessert in a hurry, I hightly recommend you keep these in mind. ;) As I mentioned, they are incredibly easy and are made with normal ingredients that most of us have in our kitchens at any time!