Friday, July 15, 2011

Friday Favorites, 7.15.11

Greetings and TGIF! Thanks to the hot weather we've had in Boston this week, I've been inspired to share some easy, cool summer desserts with you this week...ones that do not require the oven! We've all had those days when the last thing we want to be doing is standing by a hot oven baking when it's already 90 degrees out, yet we've agreed to bring a dessert to a potluck or make goodies for a coworker's birthday. What to do? Well, today I've got some ideas for you that you should definitely check out!

1) Pretzel Nutella Ice Cream Bites from Perry's Plate


(photo from Perry's Plate

These look so simple and so yummy! Who doesn't love nutella? But then you pair it with ice cream? Even better...

2) Ice Cream Sandwich Cake from Mommy's Kitchen


(photo from Mommy's Kitchen)

Again, here's another simple recipe. It only requires a few ingredients! And it allows for creativity too since you can easily use different candies and ice cream flavors to make this treat. Love it!

3) Cookies & Cream Parfaits from the Food Network


Layered pudding, whipped cream, and crushed cookies... Piece o' cake! This would be a great, quick dessert on a hot summer night when you'd like to make a treat for the kids or dinner guests. And it could easily be made more healthy too by using sugar-free pudding with low fat milk and maybe the addition of some fruit in the parfait layers?! 

4) Carved Watermelon Hedgehog from the Family Kitchen at Babble.com


And speaking of healthy, check out this super cute watermelon hedgehog! I think fruit is a fabulous option for summertime desserts. Different fruits could definitely be added to the hedgehog too to make more of a fruit salad or medley. Easy and healthy! If you wanted to indulge a bit more, you could serve the fresh fruit with some ice cream or sorbet to make it more dessert-like. 

5) Fun, Creative Ice Cream Sandwiches from the Food Network


Make sure to scroll through all the ice cream sandwiches on this Food Network website. They've put together some combinations that are quite creative! Coffee and doughnuts? A chocolate doughnut filled with coffee ice cream...  Or what about a banana bread ice cream sandwich? I don't think I'd ever think to put ice cream between two slices of banana bread, but boy, does that sound good!

There you have it - some cool, summer desserts that won't require your hot oven! Have a fabulous weekend, friends. I'm looking forward to some outdoor activities like camping and hiking! :)

Monday, July 11, 2011

Crushed Oreo Chocolate Chip Cookies


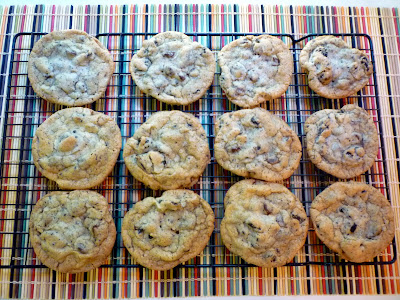
Oreos. Everyone loves 'em. Well, everyone I know loves 'em. ;-) I found some "old" oreos in my cupboard (they weren't stale, but they'd been there for several months), so since I clearly wasn't gobbling them up as is, I figured they should go into a cookie. Never let anything go to waste! 


I had seen a recipe a little while ago on the blog "Lovin' From the Oven" for chocolate chip oreo cookies, and I knew that the oreos I had were destined to go into such a delicious cookie.

Man oh man, were these cookies good! They were a big hit with everyone with whom I shared them. They were super soft and chewy in the middle and slightly crispy around the edges. Mmmm, mmmm good. With a tall glass of cold milk? Even better. Here's the recipe for you!

Ingredients:

-1 stick butter, softened
-6 Tbsp. sugar
-6 Tbsp. brown sugar
-1 egg
-1 tsp. vanilla extract
-1 and 1/4 cups flour
-1/2 tsp. baking soda
-1/2 tsp. salt
-11 Oreo cookies, broken/crushed (I used 9 or 10, which equaled about 1 and 1/3 cups)
-1 cup chocolate chips (I used semi-sweet and more like 3/4 cup)


Instructions:

Crush your oreos. :) I put mine, about 4 or 5 at a time, in a small ziploc baggie and "beat them" with the back of a wooden spoon. Grease cookie sheets and preheat oven to 350 degrees. Cream the butter and sugars until well combined. Add the egg and vanilla until incorporated.

Place the flour, baking soda, and salt in a medium bowl, and whisk until combined. Slowly add the dry ingredients to the wet ingredients, and mix well until combined. Stir in the oreos and chocolate chips until just mixed in.


Scoop onto cookie sheet in desired size, and bake for 9 - 11 minutes until cooked but still soft. Let sit on sheet for a couple minutes before removing to cooling rack.


ENJOY!


Isn't this serving tray cute? My mom gave it to me. Thanks, Mom! It's right up my alley, obviously. ;-)

I hope to be back again soon with another yummy Barbershop recipe!

Friday, July 8, 2011

Friday Favorites, 7.8.11

Friday is here already?! Don't get me wrong; I'm not complaining. It's just that this week has absolutely flown by and I can barely remember anything I did! It's been such a busy week and to be honest, I'm completely exhausted. Coming up with this week's Friday Favorites post seemed incredibly effortful when I began thinking about what I wanted to highlight this week. I actually didn't want to write about food (maybe I should go see the doctor about that?! it's so unlike me ;-)). So I came up with another fun idea instead. I decided to share with you some favorite pictures of one of the most beautiful places I've ever visited...Kauai! I went there on vacation with my family in 2008, and it was an incredibly memorable, amazing trip. And I am a super lucky gal because I am going there again in just a few weeks! I feel very fortunate.

No food at all this week, friends. Hope you don't mind. Instead, this Friday Favorites includes a few favorite pictures from my first visit to Kauai (three years ago - wow!), which was definitely a favorite trip of mine. I can't wait to go again, and these pictures are making me quite excited about our upcoming trip!


My sibs and me :)


We look young!


The whole fam ♥
Shaved ice! Nice silly face, Dad :)


Ziplining! This was so much fun.

Mom & Dad, enjoying a beautiful sunset.


I have several yummy baked goodies saved up to share with you... Now, if only I could find the time to blog about them!

Have a great weekend!

Monday, July 4, 2011

Carrot Cake Whoopie Pies


Whoopie pies. They seem to be quite trendy right now and rightfully so. Who wouldn't want to eat not one but TWO cookies sandwiched around a delicious, sweet filling? It's like two desserts in one, and if you don't think too much about the fact that you're eating two cookies, you won't feel too guilty, I promise. ;-)

I made these carrot cake whoopie pies in my mom's kitchen last weekend when I was home in upstate NY. On Saturday night, my boyfriend and I were attending a potluck get-together, hosted by one of my good college friends and her fiancé, and I obviously signed up to bring a dessert! I decided to make something simple that wouldn't require me to transport too many ingredients from Boston to NY. I immediately thought of making a cake mix cookie of some sort, and thanks to inspiration from a delicious, recent post over at Eats Well With Others for carrot cake cookies with a cream cheese filling, I had the idea to make carrot cake cookies (with cake mix to keep it simple) into whoopie pies by adding a delicious cream cheese filling. You could easily just conceptualize these as the cookie form of a classic carrot cake with cream cheese frosting (kind of like my Easter cupcakes this year!). :) 

Ingredients:

Cookies
-1 box (18.25 oz.) carrot cake cake mix
-2 eggs
-1/4 to 1/3 cup vegetable oil

Cream Cheese Filling (from Eats Well With Others)
-8 oz. cream cheese
-5 Tbsp. butter (I used unsalted)
-2 tsp. vanilla extract
-2 and 1/2 cups confectioners' sugar
-1 tsp. fresh lemon juice

Start out by making the filling since it should sit in the fridge for 30 minutes or so before using it. Combine the cream cheese and butter (both of mine were softened before I used them) in a large bowl and beat well with an electric mixer, about 2 - 3 minutes. Mix in the vanilla, and then gradually add in the confectioners' sugar until it's well incorporated and smooth. Lastly, add in the lemon juice and beat well. Let refrigerate for at least 30 minutes.


Preheat oven to 375 degrees and grease cookie sheets. For the cookies, combine the cake mix, eggs, and oil in a large bowl, and mix well with a spoon or spatula. Drop by spoonfuls of desired size onto cookie sheets and bake for 9 - 11 minutes.


To make the whoopie pies, try to choose two cookies of similar size for each "pie," and spread about one heaping tablespoonful of cream cheese filling on one cookie and then top with its matched cookie. Voilà! You've got yourself a carrot cake whoopie pie.

This particular recipe made 24 cookies overall, which resulted in 12 whoopie pies (aren't my math skills awesome??). My ratio of cookies to filling was slightly off, so I had some leftover filling (there are worse things of which to have left over though ;-)). And by the way, I checked; there are no laws against eating cream cheese filling by itself with a spoon. Just sayin'...


If I had more time while making these cookies, perhaps I would have also added some shredded carrot to enhance the carrot flavor and change the texture of the cookie a bit. You could probably also add raisins or walnuts or whatever else you might typically add to carrot cake when you make it. As is though, these cookies were still great! The tasty cream cheese filling is really what made them awesome though, let's be serious. 


Thursday, June 30, 2011

Friday Favorites, 7.1.11

Happy 4th of July weekend!

I'm about to head to the airport to fly out of town for a wedding in Ohio this weekend, so this post is going to be short and sweet (literally). I'm going to share some sweet recipes with you that I'd like to be making this weekend but won't be due to our travels!

But maybe if you're still looking for some dessert recipes to make for this patriotic holiday, perhaps you can get some ideas from these delicious looking red, white, and blue goodies....

What's the 4th of July without apple pie? (notice that rhyme? :))

This appetizing photo is from Annie's Eats...


Or maybe a flag cake? This is a classic dessert idea for this holiday. I've always wanted to make a flag cake but still haven't! And this one pictured below is actually made of cupcakes! Neat.


Pizza! The dessert kind, of course. :)


Jello always allows for creativity. Check out these stained glass jello stars from Brown Eyed Baker.


Speaking of jello, here's a fun patriotic dessert I made for the 4th last year. It was a hit!

And don't forget breakfast with these strawberry blueberry yogurt muffins from yours truly. :)

I have several recipes in the line-up, waiting to be shared with you... Hopefully I'll have more time next week to blog!

Have a wonderful holiday, all!

Monday, June 27, 2011

Bananoramaberry Smoothie


Greetings, friends! It definitely feels like summer here in Boston, and you know what summer makes me think of? Fun, cool drinks like smoothies! I made this delicious, healthy smoothie last week, and I'm not going to lie....I drank it so quickly you'd barely know I ever made it! Oops. It was just so good that I couldn't help it. :)

This made about 12 ounces or so for me, so it could easily be shared between two people too. I was selfish though and kept it for myself!

Ingredients:

-1/2 cup frozen banana (equals approx. one medium banana)
-1/2 cup frozen blueberries
-one 6 oz. container cherry flavored yogurt
-1 cup almond milk

Place all ingredients in your blender and blend away! You can certainly use any kind of yogurt you'd like. I happened to choose cherry, and it lent some great flavor to the smoothie. It also lent some of the pretty "purply" color, I think, although that's probably also due to the blueberries. You could also use regular or soy milk too, depending on your preference.


The smoothie coordinates well with my petunias!


Like my Dogfish Head beer glass? :)


Yum yum yum! Love it. I make different flavored smoothies all the time. Hopefully I will share more of them with you in the future! What are some of your favorite smoothie combinations or flavors? Do share!! :)


Thursday, June 23, 2011

Friday Favorites, 6.24.11


Friday Friday! It's here! Woohoo. It's been a very busy week, and due to the busy nature of this week, my Friday Favorites is going to be rather simple. I'm going to share with you a few recipes that I bookmarked this week and hope to make at some point...maybe in the near future but maybe not. We shall see. Either way, they're now on my to-do list!

1) Toasted Coconut Cookies from Sugarcrafter

What a unique cookie! Mmmmm. :) I am very excited to make these!


2) Whole Wheat Beer Bread from Simply Life

You all know that I love baking with beer, drinking it, AND brewing it. This simple beer bread looks so yummy! And it only has five ingredients! Yet another recipe that I can't wait to try...


(this photo was taken after my second half marathon in February 2011 in California...I will run for beer...guaranteed ;-))

3) Ice Pops with Real Fruit from EveryDay with Rachael Ray Magazine

I saw these in my latest issue of my Rachael Ray Magazine, and right away, I knew I had to try making them sometime soon this summer!! There are several flavor ideas...double berry, green apple, peach iced tea... I mean, YUM!


Guess that means I should invest in some ice pop molds now, huh? :)

4) Strawberry Rhubarb Pie from Brown Eyed Baker

Strawberry rhubarb pie is my ALL-TIME FAVORITE flavor of pie. I'm not sure if the Brown Eyed Baker's version would ever quite live up to my grandmother's (which is the best ever!), but it sure does look amazingly good! If you love the strawberry and rhubarb combo like I do, also be sure to check out my strawberry rhubarb crumb bars if you haven't already. 

I'm heading home to upstate NY this weekend for some fun events...including being the commencement speaker at my hometown's high school graduation! It's quite the honor and I'm really looking forward to it. :)

Have a fabulous, fun-filled weekend, Barbershop friends!

Monday, June 20, 2011

Strawberry Blueberry Yogurt Muffins


Here I am with another post for you. :) I'm home this evening, RESTING my ankle yet again. But lucky for you, that means another tasty recipe!

During some of my moments of restlessness this past weekend, I chose not to rest (oops) and baked instead. These muffins were a result of one of those times!

The original recipe that inspired these muffins was from the Cookin' Canuck, a blog I recently discovered. Her recipe is for strawberry yogurt muffins; yet, as evidenced by the title of this post, I made them into strawberry blueberry yogurt muffins. Ironically, I bookmarked this Cookin' Canuck recipe last week when our very own Boston Bruins beat the Vancouver Canucks to win the Stanley Cup. Too funny!


The strawberries I had were fresh, but the blueberries were frozen (I had frozen some fresh ones I bought a couple weeks ago). Oh, and I coated the berries with a little bit of flour before adding them to the batter. That helps prevent them all from sinking to the bottom.

Now, the recipe for you! It differs slightly from the original... In addition to using two kinds of berries, I also made a change of using some white whole wheat flour in place of the all-purpose. I also did not use greek yogurt, but instead I used two different Dannon light n' fit flavors. This recipe was incredibly simple! And the final product was delicious. ;-)

Ingredients:

-2 cups white whole wheat flour (I used King Arthur Flour)
-1 cup all-purpose flour
-1 and 1/2 tsp. baking powder
-1 and 1/2 tsp. baking soda
-1 and 1/2 tsp. salt
-1 tsp. cinnamon
-3/4 cup unsalted butter 
-1 and 1/3 cups granulated sugar
-3 eggs
-1 tsp. vanilla extract
-12 oz. light yogurt (I used half Dannon vanilla & half Dannon strawberry banana flavors)
-1 cup sliced strawberries
-1 cup blueberries


Preheat oven to 350 degrees. In a large bowl, whisk together the flours, baking powder, baking soda, salt, and cinnamon.

With an electric mixer, beat together the butter and sugar until light and fluffy. Add the eggs, one at a time, beating well after each addition. Beat in the vanilla extract.

Turn the mixer on low speed, and alternate adding the dry ingredients with the yogurt, beginning and ending with the dry ingredients. Do not overmix. Fold in the berries.

Coat a muffin pan with cooking spray or line it with paper liners. Fill each cup 2/3 full with the batter. Bake about 15 - 18 minutes, until the muffins are slightly golden brown and a toothpick comes out clean. Cool in the pan for a few minutes before removing to a cooling rack to cool completely.


Is there anything better than a delicious, homemade muffin bursting with sweet, juicy berries?!


This recipe made 12 muffins and eight mini loaves for me. That's a lot! I would estimate that each mini loaf is about two muffins worth.


How berry good do these look? ;-)