Thursday, August 30, 2012

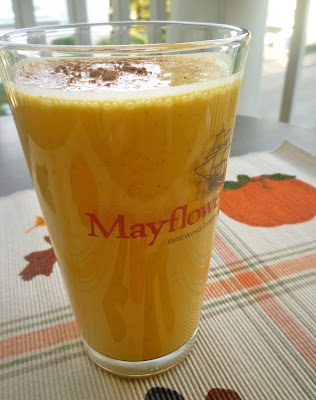
Squash (Er, Pumpkin) Yogurt Smoothie


Fall is right around the corner. The past few mornings it's been much cooler when I step out the door to head to work. And you know what? I love it. Of course, it's going to be 90 degrees in Boston this Friday, and that won't feel like fall. But that's okay. I know it's still right around the corner and I couldn't be more excited. Fall is the best!!!! And I also have some big event in my life occurring this fall...so yeah, that makes me pretty excited too. ;)

Last week when I was in the mood for fall to be here, I made this smoothie as a snack after work. It was the perfect fuel for the run that I went on later that evening. I happened to make this smoothie with canned squash. I know; random, right? Well, I happened to have some on hand so I decided to see how the squash might compare to the taste of canned pumpkin. I couldn't even tell the difference!! So from my perspective at least, you could very easy make this smoothie with either squash or pumpkin. Keep that in mind if there happens to be a pumpkin shortage this fall (but I sure hope there's not!!).

Ingredients:

-3/4 cup canned squash or pumpkin
-3/4 cup milk (any flavor or kind)
-1/2 cup vanilla or plain yogurt
-1/2 tsp. cinnamon
-handful of ice

Instructions:

Place all ingredients in a blender, and blend until well combined. Sprinkle with a dash of cinnamon on top, if you'd like. Enjoy!


This smoothie was definitely on the thicker side, so if you like yours thinner, I'd suggest adding closer to 1 cup of milk instead of 3/4 cup, or perhaps decrease the canned squash/pumpkin to 1/2 or 2/3 cup. You can really play around with it until you find the consistency you like. That's the beauty of making smoothies at home like this! I almost never go into the smoothie making process with a recipe...I just make it up as I go!


Kinda funny that I put my smoothie in a Mayflower Brewing glass... Get it? Mayflower, pilgrims, Thanksgiving, fall... You know what I'm talkin' about.


Are you as excited for fall as I am?! :)

Monday, August 27, 2012

Easy Tomato Pie


As summer comes to an end and fall is in the air (yay!), fresh tomatoes from the garden are in abundance. If you have some fresh tomatoes in your kitchen right now, I highly recommend that you make this pie with them. You will be happy that you did. Barbershop guaranteed. ;)

This recipe is from one of my favorite blogs, Sugarcrafter. Tracy has some amazing recipes on her blog, and I always look forward to a new post from her. When I saw this tomato pie recipe last week, I knew I had to make it as soon as possible! Do make sure to check out the original recipe (and the photos from Sugarcrafter because they're way better than mine!). I changed the recipe slightly though, so the ingredients listed below are actually what I used when making this. The original recipe calls for mozzarella cheese, but because I only had colby jack on hand, I just used that. I also did not have garlic scapes, so I used fresh garlic cloves (thinly sliced). And finally, I added some fresh basil to the pie also, and I omitted the mustard.

Ingredients for the crust:

-1 cup all-purpose flour
-3/4 cup whole wheat flour
-1/2 tsp. salt
-1 and 1/2 sticks unsalted butter, divided
-4 to 6 Tbsp. ice water

Ingredients for the filling:

-approx. 4 oz. colby jack cheese
-3 medium tomatoes, sliced
-1 medium white onion, thinly sliced
-2 garlic cloves, thinly sliced
-10 basil leaves, torn
-1 Tbsp. olive oil
-1/4 cup parmesan cheese

Instructions:

For the crust, whisk together the flours and salt in a large mixing bowl. Cut in half of the butter with a pastry cutter until the pieces are pea-sized. Next, cut in the second half of the butter, leaving larger pieces of butter. Add the water, a few tablespoons at a time until the mixture comes together to form a dough. Press it into a disc, about an inch thick, and wrap in saran wrap. Let rest for 20 minutes (I actually put my dough in the fridge for 20 minutes, but looking back the recipe doesn't actually say to do that. I thought it did though!).

Preheat oven to 400 degrees and roll out the dough to fit in a 9-inch pie plate. Press into the dish, and trim any extra dough around the edge. Top the crust with your cheese slices. I went "easy" on the cheese. You could definitely add more than I did. Put one layer of tomatoes on the cheese. Top the tomatoes with some of the sliced garlic and basil leaves, then add your sliced onions. Put another layer of tomatoes on, followed by more garlic and basil. Lastly, sprinkle with parmesan cheese and drizzle with olive oil.

Bake for 30 to 40 minutes, or until crust is golden brown. Allow to cool slightly before serving...and then, enjoy! :)


I really didn't fool much to make the dough look good. I was going for quick and easy here! 


No fuss needed with this recipe. Nothing needs to look perfect!


I was glad I had both yellow and red tomatoes on hand. It made the pie look so pretty, I thought!


Onions, garlic, and basil...


And the oh-so-delicious addition of parmesan cheese.


All baked and ready to dig into!


Mike and I reeeally enjoyed this pie. It was very easy to make. The dough for the crust only took a few minutes to put together, and it was very easy to form. And it was delicious to boot! Very tasty savory pie crust.


We got eight slices out of the pie. I forced myself to only eat one slice for dinner the night I made this though. I feel like I could have eaten two or three; it was so yummy!


Quick! Go make this before tomato season has passed us by! :)

Wednesday, August 22, 2012

Zucchini Pizzas


I am beginning to feel as if every food blogger under the sun right now is talking about either zucchini or tomatoes. And you know what? That's totally okay with me. :) I can't get enough of either of these veggies right now! And I'm guessing that many of you might feel the same way....

Last week I made this suuuuper easy dinner of zucchini pizzas. These cute little pizzas are so easy to put together, and they're obviously rather healthy too! They're a great weekday meal when you might be short on time. They really don't take much more than 15 or 20 minutes to make!

I adapted a recipe for grilled zucchini pizza slices from Kalyn's Kitchen. I didn't go outside to turn on the grill, so I used the inside method of broiling that's described on Kalyn's Kitchen's recipe. Couldn't be easier!!

I'm not going to list ingredients and instructions here since it's a pretty straightforward recipe. Instead, I'll just describe each step as we go here...


Preheat your broiler. Slice a large zucchini into rounds, about 1/2 to 3/4-inch thick.


After slicing the zucchini, place the slices on a cookie sheet and cook under the broiler for about 4 to 5 minutes.

Remove from oven, and top each zucchini slice with desired amount of tomato sauce.


Next, add on your toppings of choice! I made three different pizzas when I made these, based solely on what I happened to have on hand at the time. So, I made one with just tomato slices...


And one with some slices of chicken I had cooked a previous night...


And another had zucchini (double zucchini whammy!) and onions, which were already cooked and had been left over from another night.


Top each mini pizza with cheese.


I used cheese I had on hand, which happened to be provolone and feta.

After putting your toppings, place the pizzas back under the broiler for another 4 to 5 minutes or so, or until the cheese is melted to your liking.


Serve hot and enjoy!


Gosh these were good!!


I had a hard time choosing my favorite out of the three combinations I made. They were all great! I especially liked the boost of flavor that the feta cheese added. But the provolone ones were also delicious...


Easy and healthy twist on a classic!


I bet you could easily make these with squash or eggplant too.


I can't wait to make these again soon! 

Monday, August 20, 2012

No-Bake Chocolate Oatmeal Cookie Balls

This isn't the first time that I've mentioned that it's been a hooooot summer in Boston this year. And this isn't the first time that I've told you that I haven't been baking nearly as much as I normally would, partially due to the heat and partially due to my hectic schedule. Well, if you're also dealing with summer heat and a super busy schedule, then this recipe is for you! It could not be any easier.


The recipe for these treats is from one of my favorite blogs, Taste and Tell. If you don't know Deborah's blog yet, you must go check it out! She shares wonderful recipes on her blog, and in my opinion, a lot of her recipes are great for families and people with busy schedules. So definitely check out Taste and Tell! Now, onto the recipe for these addicting no-bake chocolate oatmeal cookie balls.

Ingredients:

-2 cups rolled oats
-3/4 cup white sugar
-3 Tbsp. unsweetened cocoa powder
-1 Tbsp. water
-1/2 tsp. vanilla
-1/2 cup butter, softened
-2 Tbsp. peanut butter
-1 cup confectioners' sugar

Instructions:

In a large bowl, combine the oats, sugar, and cocoa powder. With clean hands (or a spatula or spoon), mix in the water, vanilla, butter, and peanut butter to form a dough. Roll the dough into balls that are 1 to 2 inches in diameter. Roll balls in confectioners' sugar until thickly coated. Chill balls for 20 minutes before serving.


I cannot stress how easy these were! And another great feature of this recipe was that it uses very typical ingredients. For me, they're ingredients that I always have on hand, so I could whip these up at any time. And isn't that a dangerous thought?! ;)


Deliciously addicting!


I made about 16 balls from this recipe.


Of note, when I first mixed all the ingredients together to form a dough, I was a little concerned that the dough wouldn't stick together well. But, it did! As soon as I began forming the dough into balls, it stuck together just fine. So, if you have the same thought, don't worry! If for some reason you are having a hard time getting the dough to stay together, I'd recommend just adding more water, a teaspoon or two at a time.


I shared these treats with Mike's frisbee team at their tournament over the weekend, and they were a big hit! I'm glad I tried one when I first made them because they were gone pretty darn quickly!

You must save this recipe and try these no-bake balls at your next gathering. I promise you that they'll be extremely popular! :)


Tuesday, August 14, 2012

Jumbo Oreo-Stuffed Chocolate Chip Cookies

Tomorrow, August 15th, is my 30th birthday. 


I'm not worried or anxious about turning 30; in fact, I'm excited and looking forward to it. So excited that I thought I'd make myself some jumbo (and I mean juuuumbo!) Oreo-stuffed chocolate chip cookies. ;) I have so many wonderful blessings in my life...why worry about my age? I've got more important things to worry about, like making some delicious treats to share with you all!

Now, I didn't actually make these cookies for my own birthday, but it does just so happen that I made them at the beginning of my birthday week. When I was home this past weekend for my bridal shower (more on that later this week!), both my mom and my sister happened to give me some Birthday Cake Oreos (that were made in honor of Oreo's 100th birthday this past March) for my birthday. So naturally I had to bake with them! I had seen Oreo-stuffed cookies all over the web, so I knew right away that's what I'd make with my birthday Oreos. :)


The recipe is taken directly from Picky Palate's recipe for Oreo Stuffed Chocolate Chip Cookies. I decided to call them Jumbo because, well, they're huuuuge!  I measured the cookies, and they were each about 5 inches wide. Wow!

Ingredients:

-2 sticks unsalted butter, softened
-3/4 cup packed light brown sugar
-1 cup sugar
-2 eggs
-1 Tbsp. vanilla (I added only 2 tsp.)
-3 and 1/2 cups all-purpose flour
-1 tsp. salt
-1 tsp. baking soda
-10 oz. milk chocolate chips (you could easily substitute another kind of baking chip here)
-Oreos!

Instructions:

Preheat oven to 350 degrees. Line cookie sheets with parchment paper. In a stand mixer or in a bowl with an electric mixer, cream the butter and sugars until well combined. Add in the eggs and vanilla, and mix until well combined. In a separate bowl, mix the flour, salt, and baking soda. Slowly add the dry ingredients to the wet ingredients, and mix until combined. Stir in the chocolate chips.

Take one generous scoop of cookie dough (I'd estimate close to two tablespoons worth), and top the cookie dough with an Oreo. Take another similar sized scoop of dough, and put it on top of the Oreo to form a sandwich. Seal the edges together by pressing and forming the cookie dough all the way around the Oreo. Place dough balls at least 3 inches apart on cookie sheet so they don't run into each other, as they will spread while baking. Bake for 15 minutes, or until lightly golden brown (the original recipe said to bake for 9 to 13 minutes, but my cookies took quite a bit longer due to their large size). After removing cookies from oven, let sit on cookie sheet for 5 minutes before removing to cooling rack to cool completely.


The inside creme filling of the birthday cake Oreos actually tastes like cake batter! And it has fun little sprinkles of color in there too. :)


These cookie dough balls are the biggest I've ever baked!


I didn't place mine far enough apart on the cookie sheet, so they ran into each other a little bit.


The recipe says that it makes about two dozen cookies, but I only got 14 out of this recipe! Perhaps I put too much dough around the Oreos. Oh well. It was fun this way. :) With their large size, these cookies are perfect for sharing!


Best stuffed cookie ever! Well, I guess I can't say that for sure, but this is definitely a pretty darn awesome cookie!


This recipe was incredibly easy! The chocolate chip cookie dough was a breeze to put together (and it's a very good recipe too - the cookies are nice and soft). And as you can see from the pictures above, the step that involved stuffing the Oreo was super simple too. This would be a really fun recipe to involve the kids with!


Apparently I like stuffing baked goodies with Oreos. Remember my Oreo-stuffed chocolate cupcakes?!?


I'm pretty sure that you're going to want to drop what you're doing and go buy some Oreos now so you can bake these cookies.

Am I right?

;)