Pages

Wednesday, January 30, 2013

Wedding Wednesdays: The Cake & Cupcakes!

Welcome back to my next Wedding Wednesday post. :) Thanks for joining me!

Today I thought I'd share our choices for our wedding cake! Mike and I decided to go for cupcakes for our guests and a small, round cake that would be our wedding cake for the ceremonious cutting of the cake. I love the look of tiered cakes, and we considered going that route, but ultimately, cupcakes just felt so fun and are such an easy way for guests to enjoy a sweet treat at the end of the night, so that's what we went with! 

Several people asked me if I'd be making our wedding cake and my answer was always "definitely not!" Yes, I love baking, but there was no way I was going to add one more thing to my wedding planning plate. I was more than happy to let someone else do the baking! And that "someone" was our venue, Jimbo's Club at the Point. They have a pastry chef right on site, and after our tasting, we were incredibly pleased with how delicious their cake flavors were, so it was an easy decision to go with Jimbo's and not have to search for an off-site baker to make our cake/cupcakes.

At our tasting, we sampled several different cupcake and frosting flavors (see pic below). The frostings were amazing! Several of them had booze in them, which was fun. ;)


There were such frostings as cabernet chocolate, Grand Marnier, and cannoli! In the end, we chose two different frostings: Bailey's chocolate and creme de menthe Oreo. Both were incredible! We went with a vanilla cupcake underneath the Bailey's chocolate and a chocolate cupcake for the creme de menthe Oreo. For our own wedding cake, we decided on a pumpkin cake with a classic vanilla frosting. Oh man, was it amazing. I definitely wanted a fall flavor in there somehow, so that's how we decided on pumpkin for our own cake. And, just in case any of our guests weren't huge fans of chocolate (or booze in their frosting), we thought we could offer our pumpkin cake with vanilla frosting to them instead of a cupcake.

Here are some pictures of our delicious wedding cake, cupcakes, and the cake cutting! :)
(Note: these pics are a mix of professional ones and ones taken by our guests)


Mike picked out the fun cake topper we had. He loves to fish (and got his love of fishing from his dad!), so this cake topper was perfect for us. And it fit our Adirondacks venue nicely too!


We had made some signs to put next to the cupcakes so our guests would know what flavors there were!


I love the background of these pics, with so many guests having their cameras and phones out to take pics. 


I love this pic below, as it's when Mike was pointing to a little bit of frosting that I had on the side of my mouth after he fed me a bite of cake.
And I also love the reflection of the lights from inside the room in the window. It looks like there's fireworks outside!


Sealed with a kiss, of course!! ♥


Isn't that the cutest little sign?! My mom gave this to us, and it was such a perfect, sweet addition to the cake table. :)

See you again later this week for some fun Valentine's Day ideas!

Monday, January 28, 2013

Easy Appetizer: Bacon Wrapped Potato Bites


Mike and I hosted a fun beer tasting event with some friends at our place this past weekend, so we prepared a number of snacks and appetizers for our guests. Among the appetizers were these fabulous little bacon wrapped potatoes. These were some of the easiest savory bites to make! The recipe is from Martha Stewart, and I am absolutely certain that these will be making many more appearances in our lives over the years...

The Martha Stewart recipe calls for using actual baby potatoes and not slicing them. However, I just bought potatoes of any size and cut them up into smaller, bite-sized pieces that were about 3/4 to 1-inch "cubes" (they were actually not exact cubes, but you get what I'm saying!). Also, I left the skins on, but you could easily peel the potatoes if you don't love the skins. The recipe did not say to soak the toothpicks in water before baking them, but it just felt odd to me to put toothpicks in the oven, so I soaked mine in water for 30 minutes ahead of time. I'm not sure if that's really necessary, but it can't hurt, right?! I also greased my baking dish even though the recipe didn't say to. I didn't want to risk bacon getting stuck to the pan! Oh, and one more thing; I made approximately 24 bites using the proportions below. Obviously you can just cut fewer or more potatoes and bacon slices, depending on how many you want to make!

Ingredients:

-5 or 6 small potatoes, any kind
-12 slices of bacon

Instructions:

Soak 24 toothpicks in a small bowl or mug of water for 30 minutes or so. Grease a baking dish with cooking spray and set aside. Preheat oven to 400 degrees.

Cut your potatoes into bite-sized pieces (about 3/4 to 1-inch) until you have 24 pieces. Slice each piece of bacon in half. Wrap each half slice of bacon around a potato piece, securing it with a toothpick. Place all the bites in greased baking dish, and bake for 40 to 45 minutes, or until the potatoes are tender (when pierced with a fork or knife) and bacon is fully cooked and crisp.


I made some with red potatoes and some with blue potatoes, which we can find at Whole Foods. Mike and I buy them on a regular basis. I mean, it's just so fun to eat a blue potato! Although, some may call them purple. Either way, it's a colorful spud. :)


As I mentioned above, you can easily use any type of potato for this recipe. I really want to try it with sweet potatoes! And if bacon isn't your thing, you could use turkey bacon or even veggie bacon, I bet.


In the midst of being so busy in the kitchen as I was preparing various foods for our guests, I neglected to take many pictures of the final product. Luckily, I did get a couple pics though!


These tasty little bites were gobbled right up. This platter was empty in no time!


These would be a wonderful addition to a Superbowl Sunday appetizer spread this coming weekend!

Friday, January 25, 2013

Quinoa Spinach "Macaroni" & Cheese


Happy Friday!

I need some new greetings for my posts. On Fridays, I feel like all I ever say is TGIF or Happy Friday... Hmmmm. Got any bright ideas for me? :)

This quinoa "mac" and cheese dish is a fun new recipe that I tried last weekend when we were home in NY. I made it for the fam, and we all really liked it! As you may guess, there is no actual "mac" in this dish; hence, my putting the mac in quotation marks. So really, it should just be called quinoa spinach and cheese, I guess? Not quite as fun sounding...

This is a great, healthified version of mac and cheese that I believe your whole family will love. No pasta here! Just good ol' quinoa, which I love. It was incredibly easy to put together too. I made quinoa earlier in the week for another dish, and since I was planning on making this recipe later in the week, so I just cooked extra quinoa at the time to have ready when it came time to make this dish. That definitely simplified an already simple dish even more!

I originally found this recipe on Tasty Kitchen; it was a post by Two Peas and Their Pod. However, the original version was created by Bakeaholic Mama, I believe!

Ingredients:

-3 Tbsp. butter
-3 Tbsp. flour
-1 and 1/2 cups whole milk
-2 dashes grated fresh nutmeg
-1/4 tsp. salt
-8 oz. shredded cheddar cheese
-3 cups cooked quinoa (cooked according to package directions; I cooked
mine with low-sodium chicken broth)
-2 bunches fresh baby spinach

For the topping:
-1/2 cup parmesan cheese
-4 Tbsp. butter, melted
-3/4 cup bread crumbs (recipe calls for panko; I used some
I made myself with bread that was going stale)

Instructions:

Preheat oven to 350 degrees. In a medium saucepan, add the 3 tablespoons of butter and flour, whisking until a paste forms over medium heat. Add the whole milk, whisking the whole time over medium/high heat until the mixture comes to a boil. Stir in the nutmeg, salt, and cheddar cheese. When this cheese sauce is smooth, remove from heat.


In large bowl, combine the already cooked quinoa, cheese sauce, and spinach. Transfer the mixture into a casserole dish (I used one of my mother's dishes that was roughly 8 x 10" maybe?). I greased my dish, just to be safe. Top with the 1/2 cup parmesan cheese. Combine the melted butter and bread crumbs in a small dish, and then sprinkle over top of the casserole. Bake at 350 until bubbly, about 20 minutes. Enjoy!


We ate this dish along side several other dishes, as my mom had already planned a hearty lunch for the fam. She wasn't expecting me to make this quinoa dish, so it was an extra addition to our plates. :) I could easily see this working as the main dish though for a weeknight, family meal. Maybe serve it with a nice side salad and you're good to go. For anyone who might be missing meat in this dish (I think it's great without meat, but I know there are meat lovers out there!), I bet this would be tasty with either ham or maybe ground sausage mixed in?!


It would also be great with other veggies mixed in too, I bet. Perhaps some mushrooms? Tomatoes? Those are some of my favorites anyway!


For those of you experiencing this extremely chilly winter weather, I hope you stay warm this weekend! Curl up with a good book, a blanket, and a cup of tea... And perhaps a cookie or two? Now we're talking. ;)

Wednesday, January 23, 2013

Wedding Wednesdays: Centerpieces, Table Names & Decor

 Hello, and welcome to my second edition of Wedding Wednesdays! In case you missed my first post, you should probably go back and check it out. ;)  In it, I share all the fun details about the homebrewed beer that we gave our wedding guests as favors!


We were psyched about how those came out, so it was a really fun post to write. In fact, I am sure that all of these posts will be fun for me to write! And that's partially why I wanted to start this Wedding Wednesdays series. Another reason is because I wanted to share with you various aspects of our big day! And yet another reason is selfish; I thought the blog would be a great tool for me to record the details of our day and how we put them together...so, this blog is also serving as my own "memory journal" that I can look back on in the coming years. Hope you don't mind. :)

I also plan to write a "Part 2" post about wedding favors (we gave another small favor in addition to the homebrew), and that will be on its way in the next couple weeks. This week I wanted to share with you what we did for our table decor and centerpieces!

As you may know, Mike and I were married in upstate NY, where I am originally from. Our reception venue, Jimbo's Club at the Point, is a gorgeous venue on Brant Lake in the Adirondacks.


The setting is very "Adirondack-y," as we say, and the venue kind of speaks for itself, you know? It is so pretty on its own, so we didn't feel like we needed centerpieces or decor that were too complicated. We were going for a natural and simple look.


We went with the basic white tablecloths, but to add a splash of color to the tables, we ordered burgundy table runners from a great wholesale site, Koyal Wholesale, that has all sorts of wedding and event decorations. They were rather inexpensive and well worth it, we thought!


For the actual centerpieces on each of the tables, we used hurricane lanterns that Jimbo's had (we had to rent them from them - nothing comes free in the wedding world ;)), but renting their hurricane lanterns was much easier than buying our own lanterns, transporting them there, and having to figure out what to do with them afterward. So that part was easy! It took a while for us to decide on what to put around the lanterns (I had so many centerpiece ideas on my "wedding decor" pinterest board!), but we finally settled on a very natural centerpiece that created a "wreath" by combining pinecones and bittersweet vine.


(photo source)

We were very fortunate with our connections, as one of our wedding guests had tons of bittersweet growing at her house, and we were able to take some of hers. This same friend also had hundreds of dried pinecones that we were also able to borrow, thankfully. And my mother-in-law and sister also collected and dried some pinecones to make sure we had enough. Perfect!!


The day before the wedding, we assembled the wreaths of pinecones and bittersweet around each lantern on each of the tables. I have to admit though that I did very little of this part! My mother-in-law, mom, and bridesmaids did it all and did an amazing job! It took some patience, that's for sure, and I'm so grateful for their time and hard work!

Instead of table numbers, we used brewery names! Obviously the husband and I are into our craft beer, so we thought brewery names would be the perfect way to identify our guests' tables. We chose our favorite breweries and/or those that we have traveled to together.


You may also notice on the table that we had ribbons tied around each napkin, for another small touch of color. I ordered the ribbon from a different website than where the runners were from, and luckily, the colors matched exactly!


To save space and to minimize how many items were on the tables, we printed one table menu for each table, and we glued the menu, back-to-back style, to the table's brewery name sign. So easy!


Being that we live in Boston and have been to the Sam Adams brewery numerous times, that was obviously one of the table names!


Mike and I had our first date back in '08 at James's Gate, a brewpub in Jamaica Plain, MA. Although the head table didn't really need a name, we couldn't resist naming our head table after the location of where we first met! It's not exactly a brewery, but it's close enough. :)

For the head table, instead of a pinecone and bittersweet wreath around a lantern, we just created a nice arrangement of the pinecones and bittersweet, centered on the table, as you see below.


We had so much fun coming up with the ideas for our tables, putting them together, and then seeing the final "look" come together so nicely. We love how they turned out and felt that they fit our day very well!

Also, unless otherwise specified, most of the pictures in my wedding blog posts were taken by our wonderful photographers, Upstate Photographers. Gotta give credit where credit is due!


Thanks for checking out my second Wedding Wednesday post! ;)

Monday, January 21, 2013

Butterfly Cupcakes: Banana Chocolate Chip Cupcakes with Cream Cheese Frosting


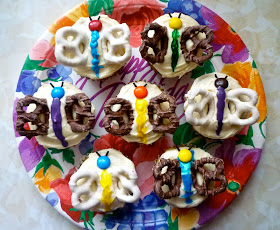
As you may remember from my post last week, my mom and grandmother both recently celebrated birthdays, and this past weekend, the hubs and I traveled home to NY so we could celebrate with them! I was in charge of the birthday dessert, and I thought cupcakes would be fun (as they always are!). My grandmother has always loved butterflies, and a while back I had seen a great little tutorial on how to make butterfly cupcakes from Martha Stewart, so I thought that this special dual-birthday celebration was the perfect time to make them!

My sister helped out with the decorating, which wasn't too difficult...  We simply frosted the cupcakes and then used colored icing for the bodies of the butterflies, chocolate covered pretzels for the wings, M&M's for the head, and sprinkles for the antennae! Cute. :)


Mike snapped a picture of my sister and me, hard at work decorating. ;)


And here's the recipe for the actual cupcakes for you! They were awesome. The recipe for the banana chocolate chip cupcakes is from Cookies & Cups, the same blog that inspired my recent pinwheel cookies recipe. The only difference I made in the cupcakes is substituting yogurt for buttermilk, simply because I didn't have buttermilk on hand. The frosting recipe is just a classic, easy version of cream cheese frosting, and I'll post that below too.

Cupcake ingredients:

 -1 and 3/4 cup all-purpose flour
-1 tsp. baking powder
-1/2 tsp. baking soda
-1/2 tsp. salt
-1/2 cup butter, room temperature
-1/2 cup granulated sugar
-1/2 cup packed light brown sugar
-2 eggs
-1 tsp. vanilla
-1/2 cup plain or vanilla yogurt
-1 cup mashed ripe bananas (about 3 large bananas)
-3/4 cup mini semi-sweet chocolate chips, tossed in 1 Tbsp. flour

Preheat oven to 350 degrees, and line muffin pan with cupcake liners. In medium bowl, sift together the flour, baking powder, baking soda, and salt. Set aside. With an electric mixer, cream together the butter and both sugars until well-combined. Add the eggs and vanilla and mix until incorporated. With your mixer on low, add the dry ingredients and yogurt (or buttermilk) until combined. Mix in the mashed bananas, and finally stir in the chocolate chips. Fill cupcake liners about 2/3 of the way full, and bake for 20 to 25 minutes, or until a toothpick inserted into the center comes out clean. Cool completely on wire rack.

Frosting ingredients:

-1/2 cup unsalted butter, softened
-8 oz. cream cheese, softened
-2 to 3 cups powdered sugar
-1 tsp. vanilla extract

Beat the butter and cream cheese together until well-combined. Add the vanilla extract and mix, and finally, slowly add in the powdered sugar and mix until the frosting reaches the desired consistency and is smooth.

For the "butterflies":

-chocolate covered pretzels
-colored icing
-M&M's
-sprinkles or thin licorice

To assemble a butterfly, first frost the cupcake. Next, create the body of the butterfly by using colored icing on top of the frosting in the center of the cupcake, as you see below (I used a couple different types of icing, including these and these). Then put an M&M at the top of the body, and place two pretzels on either side of the body for the wings. And finally, place two sprinkles or small pieces of thin licorice near the head for the antennae. Easy as that!


The flavor of the banana chocolate chip cupcakes was wonderful - very banana-y (but not too much so) and incredibly moist. You could probably even eat these cupcakes as muffins, if you wanted! And pairing the banana chocolate chip cupcakes with the cream cheese frosting worked really well.


These cupcakes come highly recommended by my family and me!


They definitely receive the Barbershop stamp of approval. :)

Btw, this post is linked up to Taste and Tell Thursdays!

Friday, January 18, 2013

Peanut Butter Nutella Pinwheel Cookies


I love easy recipes. Although I don't yet have children, my schedule seems to manage to always fill up quickly (and I know that will happen even more so with kids!), so I'm always happy to see a quick, simple recipe that doesn't require many ingredients. Then, along comes a fabulous looking recipe from Cookies & Cups for Biscoff Crescent Roll Cookies (go check out her blog post about 'em!), and I'm smitten. The recipe calls for four ingredients, friend...four!! Awesome.

When I saw this recipe last week, I think I went and bought crescent rolls that same day because I knew I had to make these little gems. I got around to making them this week, and they could not have been easier. The recipe does involve chilling the "dough" (it's not really dough though - it's crescent rolls with deliciousness inside), which is an added step, but an easy one, of course. So one evening I made the "dough" and the next evening, I baked the cookies! I think you might be thinking what I'm thinking??! Yep. This recipe could not get any easier. ;)


As I always do, I changed the recipe a bit. So, I have to confess that my version actually calls for five ingredients! :(  I didn't have biscoff spread, but I did have good ol' peanut butter and an amazing homemade chocolate hazelnut spread (which I'm calling "nutella" for the purposes of this blog post) that a coworker gave me for Christmas. I thought these two ingredients would go together very nicely, so I combined the two to use for these cookies.

Ingredients:

-1 8-oz. can crescent rolls (I used Pillsbury reduced fat)
-3/4 cup mixture of peanut butter and "nutella" (I added about 3/8 cup of each)
-3/4 cup powdered sugar
-2 to 3 Tbsp. milk

Instructions:

Unroll the crescent dough onto a cutting board, your counter (lined with parchment or wax paper), or whatever surface you choose. Pinch the dough together slightly at the seams. Spread the peanut butter/nutella mixture over top of the dough, spreading it almost to the edges. Roll the dough, from the short side of the rectangle, up tightly. Wrap it in saran wrap, and chill the dough in the fridge for at least one hour (I chilled mine overnight, and it worked great).

Preheat oven to 350. Remove dough from fridge and using a sharp knife so you don't press down too much on the roll, cut the dough into 1/4" slices. Lay the slices flat on a baking sheet lined with parchment paper, and bake for 12 - 15 minutes, or until the dough turns a light golden brown (the original recipe says 12 to 15 minutes, but mine took closer to 10 to 12, so just keep an eye on them). Let cool slightly on baking sheet and remove to cool completely on cooling rack. Make the glaze by whisking together the powdered sugar and milk. Drizzle or spread the glaze overtop of each cookie. Let the glaze set.

Then devour your cookies. :)


Now, of course, you can use the Biscoff spread like in the original recipe if you'd like to. Or, you could just use peanut butter only or nutella only. Or, use any other spread that you choose! Ooooh, maybe do a peanut butter and jelly mixture? That would be fun. There are definitely many possibilities for fillings with this recipe!


I brought these cookies in to share with my coworkers, and this is what happened...


Then, there were none.

The flavor combo of the peanut butter and chocolate hazelnut spread was really great in these cookies! And the crescent dough was perfectly light and airy. I loved these cookies with the glaze, but they'd probably be very tasty without it too! 

In case you missed it earlier this week, you should check out the first post of my new series, Wedding Wednesdays! Each week (or maybe every other week), I hope to share some fun details about different aspects of our wedding!! This week I shared the steps that went into our homebrewed beer that we gave as favors to our guests. :)

Hope everyone has a wonderful weekend!