Pages

Wednesday, October 23, 2013

Cinnamon Chip Scones


I told you earlier this week that I'd have another recipe this week that involved cinnamon chips. :)

And here it is! Cinnamon chip scones. Gosh, I loved these scones. They were sooo good! Flakey, buttery, and full of cinnamon flavor. What's not to love?

This recipe is from Buttercream Fanatic, another blog that I've recently become a big fan of. The recipe is actually a "copy cat" recipe of the Starbucks cinnamon scones. Do you know those? They're quite good, I must say. I haven't had one in a while but I remember liking them when I tried them years ago. Well, I have good news for you. This recipe is 10 times better! Maybe even more than 10 times...


The only thing I changed with this recipe was that I decided not to add the glaze. I could tell that these scones were going to be awesome on their own, so I decided to forgo the glaze. And the recipe was still a great success without it. That being said, I'm sure they are excellent with it too. So, it's up to you whether you want to add the glaze. I've included the ingredients and instructions below in case you want to add it. What I did do though, was add maple sugar on top of the scones before baking them. If you can't find maple sugar (King Arthur Flour sells it), I bet cinnamon sugar would be excellent as well.

Ingredients:

For the scones:
-1 and 1/2 cups all-purpose flour (plus more for the cutting board)
-1/2 cup whole wheat flour
-1/4 cup granulated sugar
-1 tsp. baking powder
-1/2 tsp. baking soda
-1/4 tsp. cream of tartar
-1/2 tsp. salt
-1 tsp. cinnamon
-1/2 cup cold, unsalted butter (cut into 1/2" cubes)
-1/2 cup plain Greek yogurt
-1 egg
-1/2 cup cinnamon chips
-1 Tbsp. maple sugar (optional)

For the glaze:

-1/2 cup powdered sugar
-1/2 tsp. cinnamon
-1 and 1/2 tsp. milk

Instructions:

Preheat oven to 350 degrees. Place parchment paper or a silpat on a baking sheet, or spray it with cooking spray; set aside. In a large bowl, whisk together the dry ingredients (flours, sugar, baking powder, baking soda, cream of tartar, salt, and cinnamon). Cut in the butter, using a pastry cutter, two knives, or a fork until the butter is in pea-sized pieces.

In a separate bowl, whisk together the yogurt and egg. Add to the dry mixtures and mix until just combined. Add cinnamon chips. Sprinkle flour on a cutting board, and turn dough onto the board. Knead a few times to bring the dough together, and shape into a ball. Gently press down to form the dough into a disc, approximately 8 or 9 inches in diameter. If using, sprinkle the maple sugar on the scones at this point, pressing down gently to help it stick to the dough. Use a sharp knife to cut it into eight triangles.

Transfer scones to prepared baking sheet, spacing them about 2 inches apart. Bake for 15 minutes or until they are lightly golden brown. Remove from oven and transfer to cooling rack to cool completely. If making the glaze, while the scones cool, whisk together the powdered sugar, cinnamon, and milk in a small bowl. Drizzle over completely cool scones. If glazed, store scones in fridge. If un-glazed, store in airtight container at room temperature.


Here you can see the maple sugar that I sprinkled on top of the scones before baking...


I absolutely loved how flakey these scones were. But, importantly, they weren't dry. They were delightfully buttery. In my opinion, they were the perfect scone texture.


And of course, one of my favorite aspects of these scones was simply the cinnamon chips themselves! Can't. Get. Enough.


This weekend? Make these scones. You must.


And then report back to me on how much you love them. Mmmm, k? :)

Tuesday, October 22, 2013

Whole Wheat Apple Bars with Cinnamon Chips


We are right in the middle of autumn in New England, and I am loving it. Cooler temperatures, beautiful foliage, fleece jackets, and apple picking. As October comes to a close though, the apple picking season is slowly dwindling. So, before it gets too late, I wanted to share a delicious, easy apple recipe with you! That's not to say that you couldn't make these apple bars anytime of year, of course. It's just that they're very fall-like, so I think you should make them sooner than later. ;)


The recipe is from a blog, A Farmgirl's Dabbles. I've recently become a fan of her fantastic recipes and beautiful photos. And, in particular, these whole wheat apple bars with cinnamon chips caught my eye a few weeks ago. If you're a regular reader of my blog, it comes as no surprise that I love my cinnamon chips. So these bars were hard for me to resist. And plus, they're "good for you." I mean, they have whole wheat flour and apples in them....


Ingredients:

For the bars:
-10 Tbsp. unsalted butter, melted and cooled slightly
-1 and 1/2 cups packed light brown sugar
-2 large eggs, lightly beaten
-1 tsp. vanilla extract
-2 cups white whole wheat flour
-1 tsp. baking powder
-1/2 tsp. cinnamon
-1/2 tsp. salt
-1/4 tsp. baking soda
-2 and 1/2 cups peeled, small diced apples
-1 and 1/2 cups cinnamon chips, divided

For the glaze:
-1 and 1/4 cups powdered sugar
-2 Tbsp. milk or cream
-1/2 tsp. cinnamon or cardamom
-1 Tbsp. vanilla extract

Instructions: 

Preheat oven to 350 degrees. Lightly spray a 13 x 9 pan with cooking spray, and set aside.

In a large bowl, whisk together the melted butter and sugar. Whisk in the eggs and vanilla, and set aside. In a medium bowl, whisk the flour, baking powder, cinnamon, salt, and baking soda. Add the dry ingredients to the wet ingredients, and stir until combined. Fold in the apples and 1 cup of the cinnamon chips. Pour batter evenly into prepared pan; the batter will be thick. Sprinkle the remaining 1/2 cup of cinnamon chips on top. Bake for 24 to 28 minutes, or until the bars are golden brown and a toothpick comes out clean (depending on your oven, you may want to check them before 24 minutes). Let cool completely in pan on wire rack.

For the glaze, whisk together all the glaze ingredients. When the bars are completely cooled, drizzle glaze over them using a spoon or a fork. Or you can place the glaze in a ziploc bag and cut off a small corner of the bag to pipe the glaze over the bars. Store in airtight container in the fridge. Makes about 24 to 30 bars.


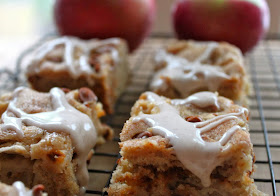
One aspect I loved about these bars was how easy they were. No mixer required and they use normal, every day ingredients. The "toughest" part was peeling and dicing the apples. And heck, if you wanted, you could probably even skip the peeling part. :) And of course, I loooved that they had cinnamon chips in them! My favorite. These bars were definitely cake-like in texture. If you're looking for a more dense bar, these might not be for you. But if cake-like is your thing, these are a must-make for you. When it comes to baked goodies with glazes, I have to admit that I often skip adding the glaze. There are some things that I just think are actually better without the glaze. But these bars? Nope. Totally better with the glaze. I mean, they're delicious on their own, don't get me wrong - but they were better with the glaze I thought! And yes, I taste tested one with the glaze and one without, just so I could provide you with this essential information. ;)


Also, a couple more points to note...  The original recipe called for a cardamom glaze, but I substituted cinnamon since I didn't have cardamom on hand. Simple substitution. I also used milk instead of cream for the glaze. I didn't have cream on hand, and I figured milk would work just fine. And it did! I was also thinking that if you're having difficulty finding cinnamon chips (it can be really hard to find them these days), I bet butterscotch flavored baking chips would be delicious in these bars, don't you think? I do, however, recommend buying cinnamon chips on amazon.com if you are having trouble finding them in the store. Personally, I always have cinnamon chips on hand. They're a staple in my kitchen. :)


Oh, and the next recipe coming your way from the Barbershop? It also contains cinnamon chips. Just can't get enough!

Wednesday, October 16, 2013

Homemade, Healthy Peanut Butter Oat Granola Bars


Homemade granola bars. Why have I not made these before?! Maybe it's because I hadn't found a recipe that's as easy as this one. This recipe is no-bake, and it comes together in 15 minutes. So simple!

I found the recipe on a site called Food 52. The comments on the post for this recipe were generally all quite positive, so I had to give it a shot! And I was not disappointed. These bars are excellent. They are full of flavor, healthy, super easy, and very portable. And to me, the fact that they're healthy and portable is the best part - being able to grab one when you're on the go is so handy!

The recipe is also very flexible. The original recipe calls for oats, pepitas (pumpkin seeds), raisins, peanut or almond butter, agave nectar or brown rice syrup, and sea salt. I changed up the original slightly though; the ingredients I used were oats, pepitas, craisins (instead of raisins), peanut butter, honey (instead of agave or brown rice syrup), and cinnamon. I omitted the salt because my peanut butter had salt in it, and the addition of cinnamon was my own change.

I've always been a granola bar gal, but I usually buy ones in the store (Kashi is my go-to brand). Lately though, I've been paying more attention to the ingredients in my food, and I have to say, the ingredients in store-bought granola bars are often less than stellar (even Kashi). So, it was time that I tried making my own! That way, I know exactly which ingredients are going into them and can control how much sugar (and other things!) are in them. Below are the ingredients and instructions for the granola bars pictured in this post. Keep in mind though that the recipe is flexible; I'll share some ideas for other ingredients later on.

Ingredients:
-2 and 1/2 cups regular oats
-1 cup pepitas (raw pumpkin seeds)
-1/2 cup dried cranberries
-2/3 to 3/4 cup peanut butter
- approx. 1/2 cup honey
-1 tsp. ground cinnamon (optional)
Instructions:

Mix oats, pepitas, and dried cranberries in a large bowl. Whisk together the nut butter, honey, and cinnamon in a separate bowl. At this point, I've found it helpful to microwave this mixture slightly, for just 10 to 20 seconds, as it softened the mixture and helped it come together. Whisk the peanut butter and honey mixture a bit more, and pour over the dry ingredients. Mix well, until the oat mixture is well-coated and everything is combined. If it feels too dry, add a little more honey.

Press mixture into a 9 x 9 (or even a 13 x 9 pan might work; your bars will just be a bit thinner) that is lined with saran wrap, foil, or parchment paper. As you can see in the picture below, I actually used my mini loaf pan, and it was perfect. Use whatever pan you have though. Press the mixture firmly into the pan, and cover with more saran wrap or foil. Refrigerate for at least 3 or 4 hours. Cut into bars (unless you use a mini loaf pan), and enjoy! Bars can be stored in the fridge for up to two weeks. You can wrap them individually in saran wrap for an easy grab n' go option, or you can store them in an airtight container. Makes 8 to 12 bars, depending on the size you make them. 


In the past week, I've made these bars twice now. That's how much we like them! And I think I will continue to make them on a regular basis. I'll probably try substituting different ingredients though from time to time. Here are just a few ideas... Raisins, craisins, pumpkin seeds, sunflower seeds, chocolate chips, cinnamon chips (I put cinnamon chips in the second batch I made!), any flavored baking chip really, other dried fruits (apricots, dates, etc.), various nuts (almonds, walnuts, etc.), and other nut butters as well (almond butter, etc.). So many possible combinations!


Also, if you do have a mini loaf pan, I highly recommend using it when you make these. It totally negated the need to cut the bars (obvi). One less step is always nice! I bet you could even make these into granola "bites" by using a muffin pan. Perhaps I'll try that next time I make these (which, let's be serious, will probably be tomorrow).


I got a new camera recently, so I went a little wild taking photos. But the high number of pictures in this post positively correlates with my love for these granola bars...

So delish!


Have you ever made your own granola bars? Do you have a favorite recipe? Favorite ingredients? I'd love to hear new recipes and ingredient ideas, so please do SHARE! :)

Thursday, October 10, 2013

Quinoa, Vegetable, Chicken Stuffed Roasted Acorn Squash


As our CSA this year is coming to an end (insert sad face here), we are receiving many of my favorite fall veggies, including some beautiful acorn squash. I love that squash season is here!!

Last week, we made a delicious dinner with one of the acorn squash, and I am so excited to share it with you. It was such a hit with both of us; I can guarantee that this dish (and variations on it) will become a regular part of the dinner rotation in our household.

The recipe is very loosely based on a recipe from Half Baked Harvest for chipotle chicken stuffed brown sugar roasted acorn squash. I had seen this recipe on the web last week, and it's where I got the idea to make this quinoa stuffed version. The method we used was very similar, but the ingredients were different. It's such a flexible recipe; you can really change it up and make it your own with your personal favorite ingredients.

I don't really have a true recipe for you here. If you're the type of person who likes to carefully follow a recipe, I recommend you check out Half Baked Harvest's recipe. We cheated a bit because I had gone out to eat with a friend one evening and had leftovers from my meal....which was red quinoa and veggies. So, we had it easy when it came to putting together this meal.

First, we cut the acorn squash in half, brushed it with about a tablespoon of melted butter (you could also do olive oil here; that's what we did the second time we made this meal) and sprinkled it with salt and pepper. The squash then went into the oven to roast at 400 degrees for about 40 minutes or so, until it was fork tender.

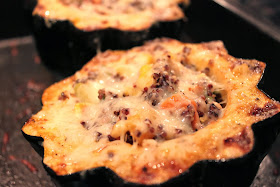
As the squash roasted, we prepared the filling, which for us, was a breeze since it involved all leftovers. :) We mixed together the red quinoa and veggies with some chopped, grilled chicken breast we had leftover from a meal we made a couple nights prior. So easy! The quinoa, veggies, and chicken all had enough spices from being previously cooked, so we didn't add any more. When the squash was soft and tender after baking for about 40 minutes, we took it out and "stuffed" each half with some of the quinoa mixture. Then we topped it with some shredded cheese before popping it back in the oven for about 6 to 8 minutes. That was enough time for the cheese to melt and the quinoa mixture to heat up.


As we were enjoying this meal, Mike said, "this is one of my favorite meals in a while."

Woohoo!


A few nights later, we made this meal again but with a different filling. That night we made "deconstructed taco stuffed acorn squash." We cooked ground turkey with a number of different veggies we had in the fridge; we literally just used up whatever we had, which ended up being onion, sweet potato, carrot, corn, and tomato, I believe. If I'd had some black beans on hand, I definitely would have added them. We stuffed the acorn squash half with the turkey and veggie mixture, topped it with cheese, and voila, we had another delicious meal! So, so good.

Definitely add this dish to your meal plan one of these weeks this fall... You'll be glad you did!

Sunday, October 6, 2013

Cinnamon Sugar Almonds


Although it's only October, I know that many of you may already be starting to think about the holidays. Crazy but true. :) And with the holidays comes gift giving. I love to give homemade gifts (usually edible ones ;)), and this recipe for cinnamon sugar almonds is a perfect homemade gift idea. The almonds come together in about 20 minutes, and they involve only 4 ingredients! So simple. And they're also sooooo good!!

I found this recipe on a website, One Charming Party.

Ingredients:

-3 cups almonds (or any other nut), raw or roasted and unsalted
-1 cup granulated sugar
-1 and 1/2 tsp. cinnamon
-1/4 cup water

Instructions:

Line a baking sheet with parchment paper and set aside. Preheat oven to 350 degrees. In a large skillet (I used non-stick), combine the sugar, cinnamon, and water. Then stir in the almonds. Over medium heat, stir all the ingredients constantly, coating the almonds with the syrupy mixture. Continue stirring until the syrupy mixture crystallizes. Once this happens, remove from heat. Pour the almonds onto the parchment-lined baking sheet, spreading them out evenly. Bake in oven for about 8 to 10 minutes more, or until almonds reach your desired crunchiness. Let cool completely and store in airtight container.


Of note, I used almonds I had purchased from the bulk bins at Whole Foods; they were roasted and unsalted. This recipe would work just as well with raw almonds as well; in fact, the original recipe called for raw almonds but I already had the roasted/unsalted ones at home, so I just used those.


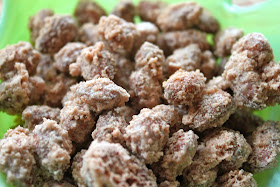
As you're making these, you may think to yourself, is the sugar mixture actually going to crystallize? It will, I promise! All of a sudden, the liquid, syrupy mixture will magically crystallize, and you'll have almonds that look like the picture below. Overall, this should take less than 10 minutes in the pan, I'd say.


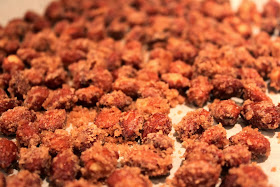
Continuing to bake the almonds in the oven is optional. I tasted the almonds after they had only been cooked on the stove, and to me, they were still a little too soft; I wanted them to be a bit more crunchy. So, I chose to bake them. And this also brings the nuttiness out of the almonds even more...


And after baking them for 10 minutes, their texture was perfect!


I served this easy, delicious snack at a get-together we hosted this past weekend. They were a huge hit!


I already can't wait to make these again. Perhaps the next time I'll try them with a different type of nut - maybe pecans or walnuts?! Next time I also may try adding a little bit of salt too, to have that sweet and salty flavor combination.


These couldn't be any easier. You'll love 'em!!

I just know it. :)


Tuesday, October 1, 2013

Beyond Baking: Fall "Treats"

Happy October!!

October is one of my favorite months. To me, it means that fall is really here. That being said, the temperature in Boston tomorrow is going to be 80 degrees! But that's okay. :) Fall is definitely still in the air!

I have to apologize that I don't have a recipe for you today, as I just haven't had it in me to blog lately. So instead of baked goodies, I thought I'd share with you some other fall "treats" - scenes from some outdoor fun we've been having lately. Apple picking and leaf peeping - two of the best fall activities, if you ask me!!

Here's a glimpse of what I've been up to the past couple weeks in lieu of blogging...


Thanks for stopping by. :) One of these days, I'll be back with a recipe, I promise!!