Pages

Thursday, May 31, 2012

Treat Thursday!

It's Treat Thursday! 

Do any of you know the Hallmark characters, Hoops and Yoyo? I looove them. They are the cutest little things! And they're hilarious too. I'm a huge fan of sending e-cards, and Hallmark's Hoops and Yoyo cards are some of my favorites. There's one e-card in particular where Hoops and Yoyo celebrate "Tuesday Treat Day." It's super cute (you should check it out :)). I didn't want to completely steal the idea, so I'm changing it oh-so-slightly and bringing you Treat Thursday... So clever, right? Haha.

(image source)

Things have been a little slow lately for me in the kitchen, so in lieu of a more traditional blog post that involves a recipe, I wanted to share with you three treats that I've been lovin' lately. I tend to go in phases with treats or snacks that I enjoy; they last a few weeks, and then I change it up and go for something new. Here's what I'm currently enjoying...

1) Cereal and Milk!

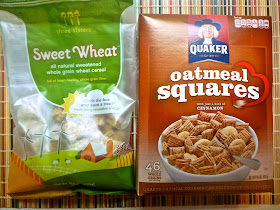
You might be thinking, cereal and milk? What kind of treat is that? Well, it's nothing super special, I realize, but it's what I've been eating lately most days after work as a snack! Two of my current favorites are pictured below. YUM! A bowl of cereal and milk (I usually do 1% organic milk or light vanilla soy milk) is the perfect snack to tide me over until dinner, and it's a great way to get in a serving of dairy for the day. Oh, and it makes me feel like a kid again which is always fun. :)


Oh, and eating cereal from a mug totally makes it taste better.


Love these little cookies! Lately I've been eating a few (maybe 8 or 10) after lunch at work for dessert. They're the perfect chocolate treat to end a meal (but you don't feel too guilty about eating them!). I love how the package specifies that they're for people too. :) They also come in cinnamon flavor. One serving of about 15 cookies is just 110 calories. Not too bad at all!


3) Peanut Butter, Banana, and Pumpkin Butter Sandwiches!

These are my new love. I have always loved the peanut butter and banana combo (I may have mentioned that a few times here on the blog!), but recently I decided to kick it up a notch by adding some pumpkin butter! My current pumpkin butter favorite is this pecan pumpkin butter by Muirhead Foods. Delicious! I keep the amount of pumpkin butter light though, don't worry. The process of making one of these sandwiches is quite simple - some peanut butter on one slice of bread topped with some banana slices (usually half a banana), and a small amount of pumpkin butter on the other slice of bread. I bet this would be really yummy grilled too...


These little sandwiches have been my go-to breakfast this week. A great way to start my day!

What are some of your favorite treats or snacks? Oh, and don't worry; many of my typical snacks also involve lots of fruits and veggies. I don't only eat cereal, peanut butter, and chocolate cats all the time. :)

Happy Thursday, friends!

Wednesday, May 30, 2012

M & M Cookie Sticks


M & M Cookie Sticks. I saw this recipe for Cookie Sticks a couple months ago on an awesome blog, Cookies and Cups, and since then, I haven't been able to stop thinking about them... No really, it's true. I've been dreaming about cookie sticks. So naturally, for the next occasion for which these were appropriate, I made them!

This past long weekend, I brought these cookie sticks to a barbecue. They were a cinch to make (seriously - a cinch) and they were a big hit! It was kinda fun to eat a cookie in stick form for a change too. You gotta try it. :)

The exact ingredients I used are below, and they vary just slightly from the original recipe.

Ingredients:

-1/2 cup canola oil
-1/2 cup granulated sugar
-1/2 cup brown sugar
-1 egg
-2 tsp. Grade B maple syrup*
-1 and 1/2 cups all-purpose flour
-1/2 tsp. baking soda
-1/2 tsp. salt
-1 cup M & M's (I used my favorite, dark chocolate)

*I substituted maple syrup for vanilla extract in this recipe. You can read more about this substitution later on!

Instructions:

Preheat oven to 375 degrees. In a large bowl, stir together the oil, both sugars, egg, and maple syrup. Add in the flour, baking soda, and salt, and stir until just combined.

Divide the dough in half (it's very easy dough to work with). On a baking sheet lined with parchment paper, press each half of the dough into an oblong shape, roughly 15 x 3 inches. Place each rectangle about 3 inches apart on the cookie sheet. Press the M & M's into the dough.

Bake for 8 to 10 minutes, or until the cookies are lightly golden browned. Let cool for at least 5 minutes before cutting into strips. Cool the strips completely before actually removing them from the cookie sheet.

Enjoy!


My two rectangles weren't exactly evenly shaped. Oh well! 


I actually used closer to 3/4 of a cup of M & M's - not the entire 1 cup that's called for in the recipe.


Now, do you remember earlier when I mentioned that I substituted maple syrup for vanilla extract? I am ashamed to admit that this avid baker RAN OUT OF vanilla extract. Whaaat?! Yes, I did. Sad. I'm not sure how it happened; in fact, I didn't even realize it until I was in the middle of making this cookie dough. My heart sank (well, maybe not really, that's a bit of an exaggeration). But I was mad at myself. How could I have not realized that I was out of vanilla extract?

The bright side of this slight catastrophe is that I learned of a great substitute for vanilla - maple syrup!! I quickly did a google search once I realized my error, and multiple sites said I could use maple syrup. Neato! I did, and it seemed to work great! I was also contemplating using some vanilla vodka I had in the cupboard... I bet that would have worked okay as well, no?


Straight out of the oven. They look like giant, rectangular cookie pies at this point.


Cut into strips!


I was a really big fan of this recipe. The taste was great, but honestly, I think I liked this recipe so much because it was so easy and fun! The sticks were a great change from the typical round cookie, and mixing up this cookie dough was pretty much the easiest thing ever. One bowl and no electric mixer needed. And it also didn't require multiple batches of cookies being baked on cookie sheets. It was just one simple batch, baked for 8 to 10 minutes in total!


If you're at all intimidated by baking, this would be an awesome recipe to "get your feet wet" with baking. It would also be a great recipe for the kids! You can use any kind of M & M's that you'd like, and you could also use chocolate chips or other flavored baking chips.


Mmmm, cookie sticks. :)

Monday, May 28, 2012

Oreo-Stuffed Chocolate Stout Cupcakes with Kahlua Cream Cheese Frosting (and Cupcake Camp!)


Helloooo! Hope everyone is having a nice, long weekend. And on this Memorial Day, please don't forget to honor and remember the men and women who have made the ultimate sacrifice for our country. As a professional who works with veterans, I feel very lucky to work with our country's heroes each and every day. So if you haven't yet, make sure to take a moment and remember our fallen heroes today.

Now, onto cupcakes!

As you know, last Monday evening I participated in Cupcake Camp! It was a super fun experience, and I look forward to hopefully participating next year too!

Before I share a more extensive recap of the event than the quick recap I shared last week, first I'd like to share the recipe for the cupcakes that I made: Oreo-stuffed chocolate stout cupcakes with kahlua cream cheese frosting.


This recipe is a combination of two previous recipes I've made, my chocolate stout cupcakes and my Oreo-stuffed chocolate cupcakes. When I made both of those recipes, I topped them with a deeelicious kahlua cream cheese frosting, which might just be in my top three of all-time favorite frostings. It's always been a big hit!

Here's the final recipe I brought to cupcake camp. The cupcake recipe is originally from Dave Lieberman of the Food Network. I followed it almost exactly. The only change I made was a substitution of yogurt for sour cream.

Ingredients:

For the cupcakes:

-3/4 cup unsweetened cocoa powder
-2 cups sugar
-2 cups all-purpose flour
-1 tsp. baking soda
-pinch fine salt
-one 12 oz. bottle of stout beer (your choice!)
-1 stick butter, melted and cooled slightly
-1 Tbsp. vanilla extract
-3 large eggs
-3/4 cup light plain or vanilla yogurt
-1 package of regular Oreos and 1 package of mini Oreos
(if you're making both sized cupcakes)

For the frosting:

-1 stick unsalted butter, softened
-8 oz. cream cheese (I used 1/3 less fat), softened
-2 to 3 cups powdered sugar, sifted
- approx. 2 to 3 Tbsp. vanilla flavored kahlua


Instructions:

Preheat oven to 350 degrees. In a large mixing bowl, whisk together the cocoa powder, sugar, flour, baking soda, and salt. In another large mixing bowl, combine the beer, melted and cooled butter (it might curdle; don't worry if it does!), and vanilla. Beat in the eggs, one at a time. Mix in the yogurt until thoroughly combined and smooth. Gradually mix the dry ingredients into the wet ingredients, mixing until well incorporated.

Grease 24 muffins tins, or line with cupcake liners (you can use large or mini muffin pans here, or both - your choice!). Spoon cupcake batter into cups, filling about 1/3 of the way full to start. Next, place one full Oreo (a regular Oreo or mini Oreo, depending on your pan) on top of the first layer of batter. Spoon more batter into each cup until each cupcake liner, large or mini, is about 3/4 of the way full. I show pictures of this "Oreo stuffing" process in this post.

Bake the large cupcakes for about 16 to 20 minutes, or until the tops are domed and a toothpick inserted into the center comes out clean. For mini cupcakes, check them for doneness after 10 to 14 minutes. Let cupcakes sit in pan for 3 to 5 minutes before removing to cooling racks to cool them completely. Make sure they are fully cooled before frosting them.

For the frosting, beat butter and cream cheese with electric mixer; add in the powdered sugar and booze and continue to mix until everything is well-incorporated. Continue to add more powdered sugar, as needed, until the frosting reaches the desired consistency that you prefer. Most times I have made this, I have definitely added closer to the full 3 cups of powdered sugar.

Frost each cupcake with the desired amount of frosting. If desired, you can also top each cupcake with some Oreo crumbs, as I did. I simply pulsed some chopped Oreos in a food processor to make the crumbs. Easy peasy!


This time around I used Wachusett Milk Stout for the cupcakes. In the past, I've used Left Hand Milk Stout (one of my personal favorite stouts!). You could also use Guinness, as well as most other stouts that are out there. It's your call! The stout definitely enhances the chocolate flavor and moistness of these cupcakes.

Now, to frost these cupcakes, I used the large open star tip of my new set of Ateco frosting tips. I loved it! In the past, I've only had regular sized tips. This awesome tutorial from Our Best Bites on "how to frost cupcakes" encouraged me to buy myself a set of large tips. It was a great decision!! I will be using the large tips from now on for large cupcakes. I actual stuck with the regular sized open star tip though for the mini cupcakes of this batch.


Another great tip? To help yourself with the sometimes challenging process of filling a piping bag with frosting, use a tall cup or glass to help you! It makes it so much easier to fill the bag. Just put the bag in the glass and then spoon your frosting into the bag. In the past I've always struggled with this, and it always seems like I get more frosting on myself or on the outside of the bag than actually in the bag!


If you're at all intimidated by frosting cupcakes, I highly recommend that you check out Our Best Bites' tutorial. It's really helpful!!


Minis! They're just so darn cute.


And the big guys.


Oreo crumbs on top! I definitely think the cupcakes improved a ton by adding the crushed Oreo on top. ;)


My cupcakes, all set for camp! I ended up making 15 large ones and about 36 mini ones from the one batch of cupcake batter. I did taste test one mini one though. Whoops! It was totally an accident, really. So, only 35 minis made their way to camp with me...


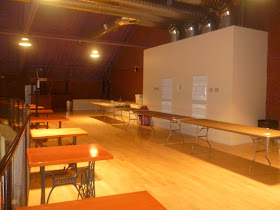
When I first arrived at Cupcake Camp (which, by the way, was held at this very cool building, the Armory, in Somerville), I was pretty early and not many bakers were there yet. I had been assigned a table on the upper level.


This was the upper level (picture below).


I didn't actually put my cupcakes out until about 10 minutes before the event was to start. I wanted them to stay fresh!


Once I got my display ready, I walked around to see a few other bakers' cupcakes.


There were some very unique flavors!


And many very pretty displays too.


I cut one of my large cupcakes in half to have on display so that people could see there actually was an Oreo stuffed inside!


Throughout the night there was a steady stream of people stopping by my table, and it was fun to hear people's reactions to the Oreo-stuffed cupcakes. They were all positive! Well, all the ones I could hear anyway were positive. :)

I had brought a knife with me so that I could cut the larger cupcakes into smaller pieces for people to sample. The minis were a perfect size for this event; however, for this particular recipe, I was personally partial to the larger cupcakes, as I thought they better highlighted the Oreo being inside. With the minis, you could still tell there was an Oreo inside, but I think the Oreo to cupcake ratio was actually greater with the large cupcakes.


One thing that I think would be great for the event next year is a "map" of sorts to help attendees get a lay of the land. Ahead of the event, we bakers had to submit which types of cupcakes we would be bringing, and a few people commented to me that it would have made their time more efficient if they had known which flavors were at which tables/in which areas. I agree - great idea for next year! And the only other suggestion I heard for a change next year was to have more napkins around! I guess a lot of attendees were experiencing sticky hands and mouths due to all the cupcakes they were tasting and not having enough napkins around to clean up. :-P

As you can see from the pictures below, the event was very popular! It was steadily busy throughout the entire duration (6:00 - 9:00 pm). I ran out of cupcakes around 8:15, sadly. If I had had more time this year, I definitely would have made more. We were away at a wedding the weekend before the Monday night the event was held, so I just didn't have a lot of time to devote to baking. Next year hopefully I can make more cupcakes - and maybe even two different kinds!


Cupcake Camp posted a great album of many more pictures of the evening on their facebook page. Definitely check it out! There are some really great shots of many of the delicious cupcakes made by the talented bakers who contributed to the event.

Several of my friends came to Cupcake Camp, and it was so nice to see many familiar faces at the event! You know who you are - thanks so much for coming. :)


All the proceeds of Cupcake Camp go to a great organization, Lovin' Spoonfuls. It was so nice to be part of an event that contributes to an important cause! Thank you very much to the organizers and volunteers of Cupcake Camp for putting on a wonderful event! And kudos to all the professional and amateur bakers out there who baked up a storm for a great cause! :)

Friday, May 25, 2012

Caramelized Onion and Gruyere Grilled Sandwiches: French Onion Soup Sandwiches!

What's not to love about a sandwich? Sandwiches are so versatile. They can pretty much be made for breakfast, lunch, or dinner. They're portable. And there are endless combinations of ingredients you can squeeze between those two slices of bread. What's that you said? My thoughts exactly. There's nothing not to love about a sandwich! A good sandwich that is. ;)


I made these french onion soup sandwiches last week as an easy weeknight dinner for Mike and me. Paired with a side salad, these sandwiches were a perfect meal! Simple and delicious.

The recipe is adapted from Joy the Baker's French Onion Soup Sandwiches recipe. Sooo good!! The ingredients below make two sandwiches.

Ingredients:

-2 medium yellow onions (peeled and cut in half, sliced into 1/4-inch thick semi-circles)
-3 Tbsp. unsalted butter
-1 Tbsp. olive oil
-1/2 tsp. dried thyme
-1/4 tsp. pepper
-pinch of granulated sugar
-3 Tbsp. beer (you could also use beef broth or white wine; obviously, I chose to use beer though)
-gruyere cheese, grated or sliced
-4 slices bread

Instructions:

In a pan over medium heat, add the butter and olive oil, and stir until the butter is melted. Add the sliced onions all at once.  Stir to coat the onions in the butter and oil. Allow the onions to cook, undisturbed, for about 4 minutes. Add the thyme, pepper, and sugar, and stir. Place the lid on the pan and allow the onions to cook for about 4 minutes at a time. Lower the heat if the onions are browning too quickly. Remove the lid to stir the onions every so often. The onions will begin to brown, break down, and look like an onion jam. 

When the onions are entirely browned and soft, add the liquid (beer, broth, or wine). Scrape any burned bits off the bottom of the pan as the liquid evaporates. This will take about 30 seconds. Remove pan from heat and allow to rest.

Butter one side of each slice of bread. On the unbuttered side, add as much cheese (sliced or grated) as you'd like, and then top with the warm onion mixture. Top with more cheese and the final piece of bread. Cook the sandwiches over medium heat in a medium pan. Flip and cook until golden on the outside and melty on the inside. 


We enjoyed our sandwiches on this pain de campagne bread from Whole Foods. It was a perfect bread for these sandwiches!!


Mike got a special ingredient on his sandwich...ham! I added that to his so it was a little more of a filling, hardy sandwich. I enjoyed mine without the ham (although I am quite the ham myself - HA!).


We both loved these sandwiches! 


The next day I brought a non-grilled version to work for my lunch. It had ham, caramelized onions, and some sliced gruyere. Excellent!


What are some of your favorite sandwich ingredient combinations?! I'd love to hear them!

Oh, and stay tuned. My next blog post will be a full recap (as opposed to a quick recap) of Cupcake Camp! And I'll also be sharing the recipe for the cupcakes I made for the event!