Pages

Friday, April 27, 2012

It's Like Being a Kid Again: Chocolate Pudding Pops!


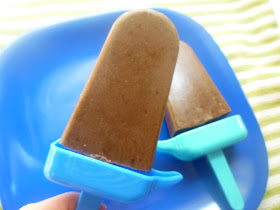
Pudding pops. Don't they remind you of being a kid? Gosh, I loved pudding pops. I also loved popsicles, but honestly, I think that if I had to choose, pudding pops would win over popsicles for me. There's something about the creamy texture of pudding that I just love...


Well nowadays, thanks to awesome little contraptions such as these "ice pop makers" that I have, we can all make our own pudding pops at home!! I got my ice pop molds at Target (well actually, my mom got them for me at Target - thanks, Mom!! :)), and I've seen them at many other stores too - all different brands, shapes, sizes, etc.


Could these instructions get any easier? I don't think so!


For these particular pops, I took the simplest route possible, and I just made Jell-O chocolate instant pudding (by mixing together the pudding mix and milk according to the box's instructions) and poured it into the molds. THAT IS ALL.


Once the pudding mix is in the molds, put the tops on and pop them (ha, no pun intended - really!) in the freezer!

I'm actually not sure exactly how long they take to set since every time I've made them, I've left them to freeze for several hours overnight (but I'm sure they don't take quite that long in reality to freeze all the way through).


These were a favorite snack of mine this week after work. It's totally like I'm back to being a kid and having a snack after school! :)


With the summer months and warmer temperatures fast approaching, you can bet that I'll be keeping these in mind as a cool, delicious treat for those hot summer days.


Oops! Since we're pretending we're kids again, should we play a little game called "Which one here doesn't belong?" haha. Wasn't that game on Sesame Street?! Any other children of the 80's out there know what I'm talkin' about? Weren't the lyrics something like "one of these things is not like the others..."???

Anyway, back to the point at hand; I had previously made some butterscotch pudding pops too and snapped a pic of one.


Now that I've tried pudding pops, the next type of frozen pop I plan to try is going to be "smoothie pops"! I think I'll try making one of my usual fruit and yogurt smoothies that I make and pour it into the molds. Ooooh, I bet it's going to be so good!!!

Aaaah, to be a kid again...

:)

Wednesday, April 25, 2012

Avocado and Tomato Grilled Cheese Sandwich

Greetings! Did you realize that April is National Grilled Cheese Month?! What a great food item to celebrate! I love grilled cheese and always have. As I'm sure it is for many of you, it's a comfort food for me that always makes me happy when I eat it. Pair a grilled cheese sandwich with a bowl of hot tomato soup and you've got yourself a perfect, comforting meal...


I did not happen to enjoy tomato soup with this tomato and avocado grilled cheese sandwich, however, because it was perfectly delicious and filling on its own! ;)

I must admit that it was a bit of a messy sandwich, but every once in a while, the messier the better, right?


Ingredients:

-two slices of your favorite bread (I happened to have Arnold 7-Grain on hand so I used that)
-2 slices of cheese (your choice!)
-tomato slices (I used 4 slices of plum tomato)
-avocado slices (I used about 1/2 of one avocado)
-butter or margarine

Instructions:

Butter one side of each of the bread slices. On the non-buttered side, put 1 slice of cheese (or however much cheese you want :)). Place one piece of bread, buttered side down, on a grill or fry pan over medium heat. Heat until the cheese just starts to melt, and then add the tomato and avocado slices, followed by the remaining cheese and other bread slice. Continue to cook over low to medium heat until the bread is grilled to your liking and the cheese is all ooey-gooey and melty (I'm pretty sure those are technical cooking terms). 


I happened to use good ol', classic American cheese for this sandwich simply because I had bought some at the deli earlier in the week and needed to use it up! I always have some cheese on hand and would probably recommend most any type of cheese with this sandwich! Provolone, monterey jack, or pepper jack are a few of my favs that you may find in my fridge at any given time...


Have you ever had Pretzel Crisps? I looove them! They come in several different flavors and are honestly just so good! A few of these crisps paired perfectly with my sandwich. I've recently become semi-obsessed with Pretzel Crisps and always seem to have a bag on hand...but that bag never seems to last long. Hmmmm...


Only a few more days to celebrate National Grilled Cheese Month, so you'd better head straight to your kitchen and make yourself a delicious sandwich! :)

What are some of your favorite grilled cheese sandwich ingredient combos? I'd love to hear them!


Sunday, April 22, 2012

Banana Chocolate Chunk Cake (And an Enjoy Life Product Review!)


To me, bananas and chocolate go together like peanut butter and chocolate. They are both such great flavor combinations! So when I recently received some Enjoy Life Semi-Sweet Chocolate Mega Chunks in the mail, I knew I'd have to use them to make a treat with either banana or peanut butter (or I could have made something with both!). Since I just so happened to have a couple ripe bananas that were perfect for baking, the bananas and chocolate combo won out. :)


As you can see from the bag, the Enjoy Life mega chunks are dairy, nut, and soy free. They are perfect for making treats for friends or family members who might have certain dietary restrictions (you can read the full ingredient list here). Since allergies and dietary restrictions are becoming more and more common these days, it's nice to have delicious, alternative options that work for everyone. In fact, all Enjoy Life products are gluten-free. Awesome!!

A few of these chocolate chunks just happened to fall into my hand and then into my mouth while baking (how did that happen?!), and I must say, they were delicious! I could have easily snacked on more than just the 3 or 4 chunks that I had... But, I knew I had to save them for baking so I practiced a little self-control. ;)


The recipe that inspired this banana chocolate chunk bread came from the blog, Framed Cooks. The original recipe for banana chocolate chip cake is posted here, and the ingredients I used are listed below. They are slightly different, of course! When do I ever follow a recipe exactly?! I chose to use both all-purpose and whole wheat flour, and I added some cinnamon to the recipe too. Finally, I increased the amount of chocolate chips (or chunks, in my case) from 3/4 cup to 1 cup. You could also easily make this cake entirely gluten-free by substituting a gluten-free flour and baking powder.

Ingredients:

-3/4 cup whole wheat flour
-3/4 cup all-purpose flour
-2/3 cup sugar
-1 and 1/2 tsp. baking powder
-1/4 tsp. salt
-1 tsp. ground cinnamon
-1 egg
-1/2 cup melted butter (unsalted), cooled slightly
-1/4 cup milk (I used 1%)
-1 cup mashed ripe bananas (about 2 medium-large bananas)
-1 cup semi-sweet chocolate chunks

Instructions:

Preheat oven to 350 degrees and grease an 8 x 8-inch baking pan. In a large bowl, combine the flours, sugar, baking powder, salt, and cinnamon with a whisk; set aside. In a separate bowl, combine the egg, melted butter, milk, and mashed bananas. Stir the banana mixture into the flour mixture until well-combined, but be careful not to over-mix. Stir in chocolate chunks.

Pour batter into prepared pan and bake until toothpick inserted into the center comes out clean, about 30 - 35 minutes. Cool completely before cutting into squares. Makes 16 servings.


Love the ooey gooey chocolate-y goodness in this photo! The chocolate chunks melted a bit during the baking, and I tell ya, they made this cake oh-so-good.


The cake itself (other than being chocolate-y) was very moist. Gotta love a moist cake!


The only problem I had with this cake was deciding whether it was better suited for breakfast or dessert. Let's just say that I've tried it out each way and it works just as well for both. :)

In the same package that contained the Enjoy Life Mega Chunks was a bag of Enjoy Life Double Chocolate Crunch Granola. Such an exciting package that was!


I don't know about you, but I love granola that is really crunchy. To me, this granola is the perfect, crunchy texture! Sooo good. And the chocolate flavor was just right too; it was perfectly chocolate-y but not overly sweet.


While baking the banana chocolate chunk cake, I decided to keep with the bananas and chocolate theme so I enjoyed a snack of some granola in a dish of banana-flavored yogurt. YUM!


The crunchy texture of the granola stood up well to the yogurt and it didn't become soggy, which was great (I don't care for soggy granola!).


It was the perfect healthy and filling snack!


The chocolate granola is nut and gluten free, so it's yet another great product for anyone with allergies or restrictions in their diet.

Thank you to Enjoy Life for sending me a couple of their fabulous products! They are sold at many different nation-wide grocery stores, so chances are, you can also find some Enjoy Life foods near you to try too. :)


Saturday, April 21, 2012

Peanut Butter Oatmeal Chocolate Chip Cookie Dough Balls


Sometimes you just need to not turn on your oven. Know what I mean? Perhaps the weather is really hot out and the thought of turning on a hot oven is unbearable. Or perhaps you're in a time crunch and you know that making something with the oven just won't fit into your schedule. Or perhaps you are trying to conserve energy (it is Earth Day this weekend after all!), and one way to do that is to ignore your oven for a bit.

A great result I had recently of not turning on my oven is these peanut butter oatmeal chocolate chip cookie dough balls. And yes, that's quite a long name for such a little treat. :) 

I saw these delectable looking treats over on the awesome blog, Keep It Sweet. In fact, she encouraged making these little gems in honor of Earth Day and conserving energy. Perfect! Yesterday evening, Mike and I were heading to our friends' house to meet their new baby (!!!) and bring dinner, but I didn't have a lot of time to devote to making a dessert. Keep It Sweet's recipe for these cookie dough balls came at just the right time! I had all the ingredients on hand and whipped these up in no time at all.

The ingredients I used are listed below. I changed the recipe a bit... The original recipe calls for applesauce but I didn't have any on hand, so I used low-fat vanilla yogurt instead. It worked great! Also, the recipe calls for whole wheat pastry flour, but I just used regular whole wheat flour. And finally, instead of mini semi-sweet chocolate chips, I used regular sized dark chocolate chips.

Ingredients:

-3/4 cup whole wheat flour
-1 cup rolled oats
-1/2 cup peanut butter
-1/3 cup maple syrup (I used grade B)
-1/4 cup low-fat vanilla yogurt
-1 tsp. vanilla extract
-1/4 cup dark chocolate chips

Instructions:

Line a jelly roll pan or cookie sheet with wax paper. Whisk together the flour and oats in a medium bowl and set aside. Use an electric mixer to beat the peanut butter, maple syrup, yogurt, and vanilla together until well-combined. Stir in the flour mixture until just combined, and then stir in the chocolate chips.

Using a cookie dough scoop or a spoon, scoop about two tablespoons of dough and roll into a ball with hands. Repeat until all the dough is used. It should make about 16 balls. Place balls on wax paper and let set in the fridge or freezer until firm. It shouldn't take too long for them to firm up (I put mine in the freezer for 20 minutes and that worked great!).


You're going to love these, I promise.


I couldn't resist taking a few pics of the cookie dough balls on this plate. They really are "easy as pie" to make!!! 


:)


Deeelish!!!


Wednesday, April 18, 2012

Peanut Butter Cup Stuffed Dark Chocolate Brownie Cups


I'm sorry I haven't been around lately with a yummy recipe to share with you all. Been busy busy! And we were away in NY this past weekend, which means I didn't have time in the kitchen to create any new recipes. However, as soon as I returned I got right back to it! And the first thing I made was these absolutely delectable peanut butter cup stuffed dark chocolate brownies. Yep, I did that.


I'd had this box of brownie mix sitting around for a while so I felt like using it...


And I also had these Reese's peanut butter cups lying around (bought in an after-Easter 50% off sale, woohoo!)...

So I thought, why not put the two together? And the result? Perfection.

And the recipe itself could not be any simpler.

Ingredients:

-1 box brownie mix (any flavor or brand)
-15 (or so) unwrapped peanut butter cups

Instructions:

Unwrap the peanut butter cups. Preheat oven and prepare brownie mix according to directions on the box. I chose to make the "fudge-like" brownies and only added 1 egg (vs. the "cake-like" with 2 eggs). After mixing together the brownies according to the package's directions, line a muffin pan with cupcake liners. Spoon one generous tablespoonful of brownie batter into the bottom of each cupcake liner (the batter will be about 1/4 to 1/3 of the way up the liner). Next, place one peanut butter cup in the center of each brownie cup. Finally, place another generous tablespoonful of batter on top of the peanut butter cup until it is covered and the batter fills each muffin cup 2/3 to 3/4 of the way full. Bake (at temperature specified on the brownie box) for about 15 to 20 minutes, or until brownies are "cracked" on top and the batter is cooked through (it will be easy to tell by looking at the brownie cups; however, if you'd prefer, you can also place a toothpick in the outer edge of the brownie to test for doneness - not the middle because that's where the peanut butter cup is!).

After removing the pan from the oven, let the brownies sit in the muffin pan for 3 to 5 minutes before removing and placing on cooling rack to cool completely. Store in airtight container.

This recipe made 15 brownie "cups" for me with the 19.8 oz. family size brownie mix.


The first layer of brownie batter...


Next - the all-important peanut butter cups!


And lastly, the remaining brownie batter goes on top....


The brownies will indent a bit in the middle. No worries there! It's normal.


I "forced myself" to taste test one (and I really needed to in order to get a picture of the inside!!). This one was fairly fresh out of the oven and oh-so-gooey-and-delicious.


Out of control good, I tell ya!!!


Can't you picture yourself enjoying one of these with a tall, cold glass of milk?! Thought so. Better go get yourself a box of brownie mix and some peanut butter cups... ;)