Pages

Wednesday, November 30, 2011

Easy Pumpkin Crumble Cake


Greetings, friends! About a week ago I was busy making this pumpkin crumble cake to have for Thanksgiving dessert with my family the next day. The adjective easy is incredibly accurate for this dessert. Talk about simple! This recipe was just what I was looking for - no fuss ingredients, takes very little time, and delicious, of course! Delicious is always a requirement.

This recipe is from the tried and true, always yummy blog, Our Best Bites (I've mentioned this one a few times before). The original recipe can be found here but I've written it below for you as well. Note: part of what makes this so easy is that it uses yellow cake mix. Although I do love making things from scratch, you also know that I love a shortcut from time to time (as evidenced by my beloved cake mix cookies here, here, and here!).

Ingredients:

-1 box yellow or white cake mix (I used an 18.25 oz. box of yellow)
-1 to 2 sticks of butter (see notes in instructions)
-1 can pumpkin (15 oz.)
-2 eggs
-1 can sweetened condensed milk (14 oz.)
-1 tsp. cinnamon
-1/2 tsp. pumpkin pie spice
-1/4 tsp. ginger
-1/8 tsp. cloves
-1/8 tsp. nutmeg
-1/2 tsp. salt
-1/3 cup chopped pecans
-1/2 tsp. additional cinnamon for topping

Instructions:

Preheat oven to 350 degrees. Place 2 cups of the cake mix in a bowl. Cut in 3 Tbsp. of chilled butter. I used my fingers (as the original recipe suggests) to crumble the butter into small pieces. Place this cake mix and butter mixture in the bottom of a 13 x 9 pan (I greased mine even though the recipe didn't specify) and press flat with your hands/fingers.

Mix the pumpkin, eggs, sweetened condensed milk, and spices until smooth. Pour on top of the cake mixture in the pan. Take the rest of the dry cake mix and mix in 1/2 tsp. cinnamon. Sprinkle it all over top of the pumpkin mixture. Before you put the remaining cake mix in the pan though, measure it so you know how much you have, and here's why: for every cup of cake mix, you'll need about 3 Tbsp. of melted butter. Since cake mixes vary in size (they're not all 18.25 oz.!), you may have a different amount of cake mix left than the next person after you use the first 2 cups of it for the bottom layer.

After sprinkling the cake mix and cinnamon mixture on top of the pumpkin layer, sprinkle the pecans evenly over top. Then, depending on how much cake mix you sprinkled on, melt the appropriate amount of butter and then drizzle the butter evenly over top of everything. That's it!


SPICES. :) I used more than what the recipe listed.


Bake for about 40 minutes or so, or until a toothpick or knife comes out clean. Serve it warm, chilled, or room temp - whatever you prefer! I served it room temp on Thanksgiving. I also served it with cool whip, but you could definitely make your own whipped topping or serve it with classic vanilla ice cream or any other yummy ice cream flavor. Options options!!

Now, I have to confess that I somehow forgot to add the salt. Whoops! But, as far as the various ingredients go, that was a good one to forget since the lack of salt wouldn't affect the taste as much as say, a lack of pumpkin would. ;) Also, I didn't have pumpkin pie spice so I just added a little extra of everything (cinnamon, ginger, cloves, nutmeg).


Super simple and super tasty. It was a nice change from the more traditional pumpkin pie (even though I love that too!!).

I made this the day before Thanksgiving which worked out well since I didn't take up any space in the kitchen or need to use any dishes on Thanksgiving day. I stayed out of my mom's way as she was cooking. :)


Easy as pie! ;)

Monday, November 28, 2011

Chocolate Chip Pecan Cookies


I have a new favorite chocolate chip cookie recipe. This one! I've been meaning to try this particular recipe for a while now, and I am thankful I finally did. These cookies turned out to be just what I look for in a cookie...soft and chewy yet just very slightly crispy on the outer edge (very slightly). And they were super easy to make too! That's always a bonus.

This recipe is from a fun cookbook my sister gave me a while ago - Gourmet Meals in Crappy Little Kitchens.


Now I wouldn't say that I have a crappy kitchen, nor do I have a little one, but the recipes in this book are right up my alley. They're generally on the easy side, yet they're delicious and unique. A few examples of other recipes include crabtastic avocado cakes, grilled cheese sandwich soup, daylight come and me want pork stew, the mean green frittata, butternutty squash bread pudding, fig and lavender honey yogurt pie, and mexican chocolate soup. Interesting, right? Many of the names of her recipes are hilarious actually (there are probably at least 100 recipes in the book). This cookie recipe is probably one of the more traditional recipes in the book. Some recipes do require ingredients that the average, everyday cook like me might not have on hand on a daily basis. But none of them really require totally off-the-wall ingredients that are hard to find either. There. That was my short and simple review of this cookbook! Now I'll finally get to the point - the cookie recipe!!

Ingredients:

-6 oz. unsalted butter, melted
-1 cup packed light brown sugar
-1/2 cup sugar
-1 whole egg plus one yolk
-2 tsp. vanilla extract
-2 cups plus 2 Tbsp. all-purpose flour
-1/2 tsp. salt
-1/2 tsp. baking soda
-2 cups bittersweet chocolate chips (or flavor of your choice)
-1 cup pecan pieces (toasted, if desired)

Instructions:

Preheat oven to 325 degrees. Melt the butter in the microwave but allow it to cool down a bit to keep it from melting the chocolate prematurely. Using your whisk, combine the butter and sugars together in a large bowl. Whisk in the egg, egg yolk, and vanilla. In a medium bowl, sift together the flour, salt, and baking soda. Add this flour mixture to the butter and egg mixture and fold until just combined. Fold in the chocolate and pecan pieces. Be careful not to overmix.


Line cookie sheets with parchment paper. Drop cookie dough by the spoonful (whatever size you desire; the cookbook said use a 1/4 cup measure, but mine were tablespoon-sized) on cookie sheet, placing at least 2 inches apart. Bake for 15 - 20 minutes. When the edges are just lightly golden brown, remove from oven. Allow the cookies to cool on the sheet for a couple minutes before removing to cooling rack. Once fully cooled, the cookies can be stored in an airtight container.


A couple other points to note... I actually used milk chocolate chips, not bittersweet, simply because that's what I had on hand when I made this recipe (and I didn't plan ahead and buy bittersweet ahead of time; I made these cookies kind of last minute...). Also, initially, the cookie dough was a tad dry, in my opinion. The recipe calls for 1 egg and 1 yolk. I was wondering if it might be okay to add 2 whole eggs? Perhaps that would make the dough less dry. What I ended up doing was adding a couple tablespoons of milk to the dough before forming it into balls to put on the cookie sheets. Perhaps you'll have better luck with the recipe as is if you try it. If you have a similar experience to me though, maybe try adding two full eggs or a teeny bit of milk like I did. It worked like a charm! The cookies likely would have turned out just as well if I hadn't added the milk, but it seemed necessary to me at the time.


As I look at these pictures, I'm thinking that I might need to make another batch of these cookies ASAP! My mouth is starting to water...

:)

Talk to ya again soon!


Tuesday, November 22, 2011

Baked Stuffed Apples

I had never made baked stuffed apples before this recipe even though I have often thought about making them... I'm glad I finally did since they were super yummy! 

This great recipe came from an awesome blog, Eat, Live, Run. Check it out! And her pictures are waaay better than mine so this recipe looks a lot more appetizing on her site. :)


Ingredients:

-4 large apples (the original recipe recommends Granny Smith; I actually used some Golden Delicious and Macintosh because that's what I had)
-1 and 1/2 tsp. pumpkin pie spice (or a mixture of cinnamon, nutmeg, cloves, etc. - whatever you have!)
-1/2 cup apple juice (I used apple cider)
-1/4 cup pure maple syrup
-1 Tbsp. butter, melted
-1/3 cup dried cherries (I used craisins)
-1/3 cup roughly chopped walnuts (I used slivered almonds)
-1/4 cup cinnamon baking chips (this was my own addition - not in the original recipe)
-1/3 cup brown sugar, lightly packed (I think I used closer to 1/4 cup)

Instructions:

Preheat oven to 350 degrees. Combine the pumpkin pie spice, dried cherries, walnuts, and brown sugar (and cinnamon chips if you decide to use them) in a bowl and set aside. 

Carefully core the apples, making sure not to cut through the bottom. Fully fill the cavity of each apple with the brown sugar mixture and place apples in a glass baking dish with the apple juice poured in the bottom. 

Mix together the maple syrup and melted butter and drizzle over top the apples. Cover with tin foil and bake for 40 minutes. Remove foil and bake for another 20 minutes or until the apples are tender.


Love this mixture of ingredients!!


Please forgive me not-so-great pictures. It's so hard to take good pictures when it's nighttime and no natural light to help out!

My overall appraisal of this recipe? Awesome! It was super easy and on the healthy side as far as desserts go. The tender, baked apples were incredibly flavorful and the filling inside was delicious! As I mentioned above, I substituted a few ingredients (craisins for dried cherries, almonds for walnuts, apple cider for apple juice), and I added one of my own (cinnamon chips). The flexibility of this recipe also makes it awesome. There's a lot of room to be creative here! Now, if you were looking to make this a little less healthy and a little more indulgent, I'd say that a nice scoop of vanilla ice cream would pair very well with the baked apples, wouldn't you? :)

Sunday, November 20, 2011

Crock Pot Apple Cider Beef Stew


Last weekend I went wedding dress shopping all day on Saturday with my mom, sister, and future mother-in-law. What a wonderful day! And yes, I found a dress. ;) Why am I telling you this? Well, since I knew we were going to be gone all day, I thought it would be the perfect day to have dinner slowly cooking in the crock pot all day so that we could have a yummy meal waiting for us when we got home (and so that the house would smell delicious too!). I figured we'd be much too tired from dress shopping to cook. And I was right; wedding dress shopping is exhausting! But it's also super fun. :-D

I found this recipe for Apple Cider Beef Stew in one of my cookbooks specifically dedicated to slow cooker recipes. Now that the weather is getting colder, I've been thinking about using my crock pot much more often but just hadn't gotten around to it yet. I'm glad I finally did use it with this recipe! It was a great recipe to start off crock pot "season."

Ingredients:

-2 lbs. stew beef
-8 large carrots
-6 medium potatoes (I used red potatoes)
-2 apples (you can use whatever kind you have on hand! I think I used Macintosh)
-1 small onion (I used a yellow onion)
-salt, pepper
-thyme and other herbs you like (I also added herbs de provence)
-2 cups apple cider

Instructions:

Cut the beef into 1/2-inch cubes. Peel and slice the carrots and potatoes (I cut mine into about 1/2-inch pieces - and I actually did not peel my red potatoes). Also cut the apples into 1/2-inch pieces. I left the skins on the apples but you could peel them if you wanted. Finely chop the onion.

Place the carrots, potatoes, and apples in the crock pot. Add the beef, and sprinkle with salt, pepper, thyme, and onions. Pour the cider over top. Cover and cook on low setting for 10 - 12 hours. Makes approximately 8 - 10 servings.

Serve hot and enjoy!

I didn't list an amount for the spices/herbs because I think you can just eyeball how much you add. My guess is that I added about 3 teaspoons total of the various dried herbs and maybe about 1/4 tsp. salt and 1/2 tsp. pepper? Sorry - I didn't measure!


Along with our yummy stew, I served some deeelicious bread from When Pigs Fly, one of my favorite bread bakeries. This particular bread was their baby spinach, onion, and garlic ciabatta. Sooo flavorful! I am lovin' that there's a When Pigs Fly in the town where I live, but my wallet and waistline aren't as happy about it. ;)

Back to the stew... This was a very tasty, hearty, comforting dish - just what you want when it comes to beef stew! The apple cider was detectable and added a unique flavor. And the apples added a bit more nutrition too! All in all, this dish was a winner.

Yay for crock pot cooking!

Wednesday, November 16, 2011

Pumpkin Pudding Graham Cracker "Cake"


This dessert recipe has to be one of the most simple dishes ever... Seriously. Trust me on this one. Anyone can do it! This recipe is actually the same as my easy icebox cake that I shared with you last year. Essentially it's just a dessert with layered graham crackers, pudding, and cool whip.... Hellooooo easy! I thought it would be more fun to call it pumpkin pudding graham cracker "cake" this time around though. ;-)

Ingredients:

-1 box pumpkin flavored pudding (I used JELL-O's pumpkin spice flavor)
-8 to 10 full graham crackers
-cool whip

Instructions:

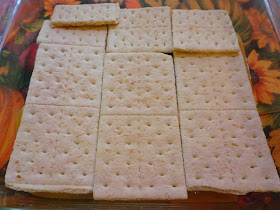
Make the pudding according to the directions on the box and make sure it's set before proceeding. In an 8 x 8 or 9 x 9 pan, place graham cracker sheets so that they cover the bottom. My pan was an 8 x 8, and it took a little more than 4 full crackers to cover the bottom. Next, spread half the pudding over top of the graham crackers until it's smooth. Cover with another layer of graham crackers and then another layer of pudding (use the rest of it). Let the dish sit overnight in the fridge (or for several hours) so that the pudding seeps into the graham crackers and makes them soft.

If desired, you can spread cool whip evenly over top of the pudding before slicing the "cake" into pieces to serve, or you can just serve it by putting a dollop of cool whip on each piece. The latter way may be slightly safer just in case someone doesn't care for cool whip!


I forgot to take a picture again after I smoothed out the pudding here on the top layer.


I also forgot to take a picture until half the dish was already gone! Oops. It went fast. :)


Yummy layers! So simple yet delicious and fun.


You can obviously make this with any pudding flavor you'd like! One time I made it with pistachio pudding and another time I went wild n' crazy and made this with two different pudding flavors...wowzers! And then I even threw in a couple layers of fresh fruit. Yikes! Something must have gotten into me that day. I just went crazy. And it's also always fun to top this with some fun, colored sprinkles or maybe some crushed graham crackers for an added crunchy texture. You can also make this in a larger pan like a 13 x 9, but you may need to use two boxes of pudding with the larger dish and obviously more graham crackers too. :)

Happy mid-week, all!

Tuesday, November 15, 2011

Barbecue Chicken Pizza with Roasted Sweet Potatoes, Peppers, Onions, and Rosemary on Multigrain Dough


Homemade pizza is probably in my top three dinners of all time. I love its versatility and the opportunity it provides to have a fairly healthy meal that's also a comfort food. :) I've written previously about some of my favorite combinations of toppings, and I've also shared an awesome savory pumpkin pizza dough recipe on the blog. Today I'm sharing a "recipe" for a most delicious pizza that Mike and I made last week - barbecue chicken pizza with roasted sweet potatoes, peppers, and onions on multigrain dough. YUM!

I used the multigrain pizza dough from Whole Foods when we made this pizza. Oh my goodness. This dough is the best! A Whole Foods very recently opened where I live, and I am sooo excited about it. Last week I picked up the last bag of multigrain dough that was on the shelves at the time, and I think it was meant to be. WF multigrain dough + me = a match made in heaven. Try not to be too jealous, fiance Mike. ;)

Now, this recipe doesn't really have exact measurements, per se. When making pizza, I just eyeball everything. So I apologize for not having measurements, but you'll get the idea!

Ingredients:

-pizza dough of your choice (you can make your own, of course!)
-barbecue sauce (I used a honey bbq sauce)
-cooked chicken, shredded or cut into bite-sized pieces (I baked a medium sized chicken breast with bbq sauce and then cut it into bite-sized pieces)
-roasted sweet potatoes (about 3/4 cup or so; I used leftovers I had roasted a couple nights prior, and at that time they were seasoned with salt, pepper, and rosemary)
-pepper (any color!), sliced
-onion, diced
-dried rosemary or other herbs of your choice
-shredded cheese of your choice (I used a store bought "Italian" blend of cheeses)

Instructions:

Preheat oven to 425 degrees. If using a pizza stone, preheat it in the oven (to prevent it from cracking). Saute your onion and pepper in olive oil, over medium heat on the stove, for 6 or 8 minutes until they start to get soft (they will cook more in the oven). Spread out your dough until it's as thick or thin as you'd like. Evenly spread a few tablespoons (or so!) of bbq sauce across the dough. Place the rest of your toppings (cooked chicken and veggies) evenly on top of the bbq sauce, and then sprinkle with your preferred flavor(s) and amount of cheese. I typically don't like my pizza too cheesy, as I don't want the cheese to overpower the taste of all the other delicious toppings! And it's healthier with less cheese too. ;) We chose to sprinkle some dried rosemary over top of our pizza before baking it. Feel free to add whatever herbs you might like!


(Terrible lighting there; sorry! But this is the dough with the bbq sauce spread on it.)

If you preheated a pizza stone, transfer the pizza to the stone and bake for 10 - 12 minutes (that's how long my pizzas take anyway!) or until the outer crust edges start to turn a light golden brown. I have preheated my pizza stone before, and I also haven't... It's turned out fine every time, but I guess you should probably do whatever your pizza stone's instructions tell you to do! I have an awesome Pampered Chef stone that my mom gave me. Love it!

Let your pizza sit for a couple minutes before slicing it. Then, ENJOY and try to hold back from eating the entire thing in one sitting. ;)


Below you'll see a slice of the bbq chicken pizza, but what's that on the left, you wonder? Well, it's the other pizza we made the same night! The second pizza was a tasty broccoli, tomato, and goat cheese pizza on Whole Foods white dough. Also super delicious! However, the bbq chicken and sweet potato pizza really stole the show, which is why I decided to share that one with you.


What toppings and flavor combinations do you like best on your own homemade pizza?!

Hope everyone is having a great week so far! :)